In summary:
- Stop hunting for one ‘perfect’ pod; instead, build a personal ‘vaping ecosystem’ with opportunity charging and strategic redundancy.
- Evaluate a pod’s real-world usability with the one-handed ‘Ergonomic Triangle’ test: Grip, Activation, and Mouthpiece Journey.
- Extend battery life by over 20% by optimizing your technique: use higher resistance coils (1.2Ω), 50/50 e-liquids, and shorter puffs.
It’s the commuter’s nightmare: 2 PM, you’re between meetings, and your pocket pod is blinking its last sad, red light. You chose it for its size, its stealth, but now it’s just a useless piece of plastic. The common advice is predictable: get a device with a bigger battery, a higher mAh rating. But for the daily commuter, sacrificing pocketability for a bulky power bank of a vape is a poor trade-off. What if the problem isn’t the battery’s size, but our entire approach to using it?
The solution isn’t found in a bigger number on a spec sheet. True all-day reliability comes from building a personal, robust vaping ecosystem. This is a shift in mindset from relying on a single device to creating a strategic system of device, charging habits, and usage patterns that is resilient to the demands of a full 8-hour workday and commute. It’s about treating your vape not as a simple consumer good, but as a piece of essential daily equipment that requires a strategy.
This guide will deconstruct that system. We will explore how to calculate real-world runtime, how to choose a device based on its one-handed ergonomics, not just its looks, and how to implement tactical optimisations that can extend the life of any pod. Forget the endless search for a magic battery; it’s time to build a system that can’t fail.
Summary: Your Guide to a Fail-Proof Commuter Vaping System
- How to Find a Pocket Pod That Lasts Your Full 8-Hour Shift?
- 200mAh or 400mAh Pod: Which Size Balances Pocketability With Capacity?
- How to Choose a Pod System You Can Use One-Handed While Walking?
- The Build Quality Signs That Predict Whether a £20 Pod Kit Will Last 6 Months
- How to Make Your Compact Pod Last 20% Longer Between Charges?
- Why Mini Pod Systems Create 70% Less Visible Vapour Than Sub-Ohm Tanks?
- Which Pod Systems Have Pressure Equalization Valves for Air Travel?
- How to Vape at Work Without Your Colleagues Knowing You’ve Left Your Desk?
How to Find a Pocket Pod That Lasts Your Full 8-Hour Shift?
The promise of an « all-day battery » is the biggest marketing myth in the compact pod world. For a commuter, « all-day » means from the moment you leave home until you return, a period often exceeding 10-12 hours. No single, ultra-portable device can reliably meet this demand under consistent use. The analysis of the market shows that typical small pocket pod systems battery capacities range from 200 to 400 mAh, which is simply not enough for a full day’s worth of puffs.
The solution is to stop thinking about a single device and start building a personal power ecosystem. This strategic approach removes the anxiety of a single point of failure (your one pod dying) and replaces it with a resilient, predictable system. It involves understanding your real needs and deploying your resources—time, charging opportunities, and devices—intelligently.
Instead of hoping for the best, you create a structured plan. This involves calculating your actual usage, leveraging small charging windows, and having a backup that doesn’t weigh you down. This three-pronged strategy is the only realistic way to guarantee you’re never left without power halfway through your day.
Your Action Plan: The 3-Step Battery Ecosystem Strategy
- Calculate Your Real-World Runtime: Use the formula: (Battery mAh ÷ Coil Power in Watts) × Efficiency Factor (use 0.7-0.85 for devices with quality chipsets) to get a realistic estimate of runtime in hours. This gives you your baseline.
- Implement Opportunity Charging: Choose pods with fast USB-C charging (2A or higher). The goal is not a full charge, but quick 10-15 minute top-ups during a coffee break or at your desk. This fundamentally changes how you manage power.
- Deploy the Dual Pod System: Carry two smaller, fully-charged pods (e.g., 400mAh each). This guarantees over 8 hours of coverage, provides redundancy if one fails, and maintains better pocketability than one large, bulky device.
200mAh or 400mAh Pod: Which Size Balances Pocketability With Capacity?
The debate between a 200mAh and a 400mAh pod isn’t just about numbers; it’s a fundamental choice about your daily rhythm. Thinking of it in terms of coffee is helpful. A 200mAh pod is like an espresso shot: small, intense, and consumed quickly. It’s designed for maximum portability and rapid charging. It delivers what you need, but it expects you to be near a power source for a top-up soon after. It’s the perfect companion for a short trip or if your day is filled with « opportunity charging » moments.
The 400mAh pod, on the other hand, is like a larger drip coffee. It offers endurance and is designed to last a longer session, getting you through the morning commute and well into your workday without needing immediate attention. It trades a little bit of the ultra-sleek form factor for a larger capacity reservoir of power.
As the visual metaphor suggests, the choice depends entirely on your consumption pattern. There is no single « better » option. An office-based commuter with a USB-C port on their desk might be perfectly served by the ‘espresso shot’ 200mAh device, enjoying its minimal pocket footprint. A field-based professional who is away from a desk all day would be better served by the ‘drip coffee’ endurance of a 400mAh device, or even a dual-pod system as part of their ecosystem.
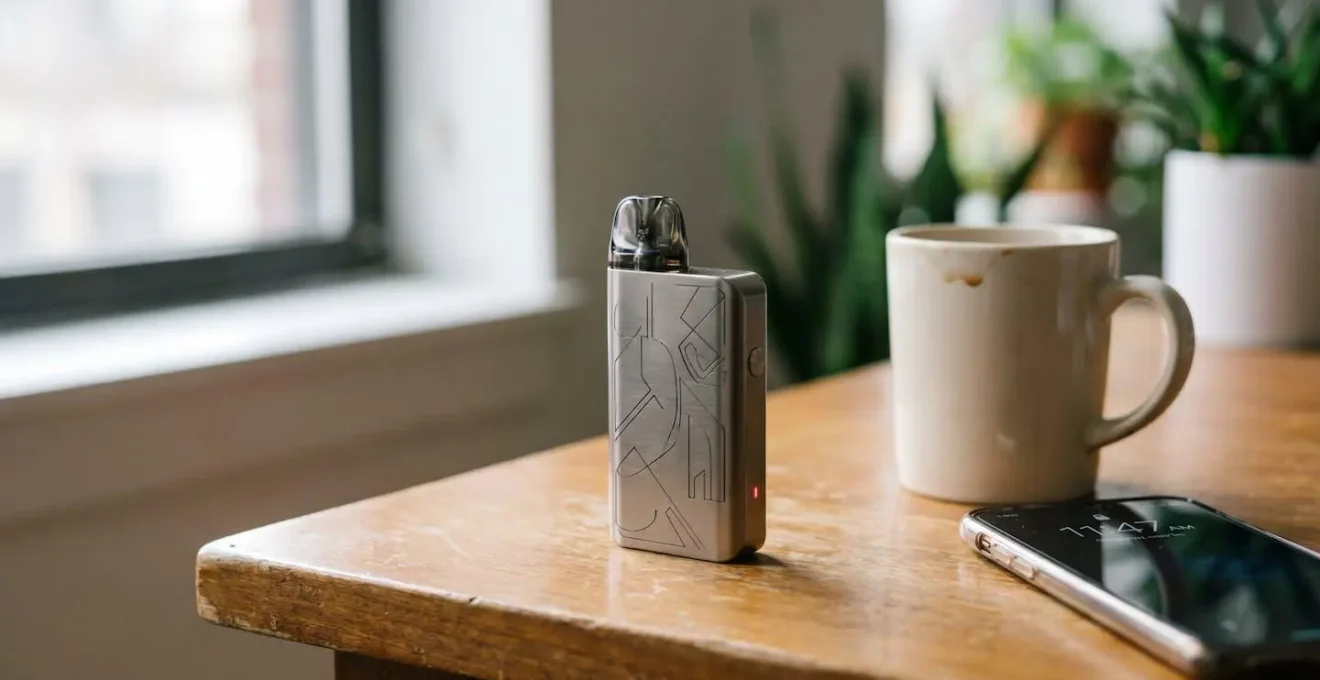
How to Choose a Pod System You Can Use One-Handed While Walking?
For a commuter, a vape’s « in-hand feel » is not a luxury; it’s a core functional requirement. You’ll be using it while walking to the station, carrying a bag, or holding onto a rail. A device that requires two hands or a conscious grip adjustment is a device that will quickly become a frustration. Evaluating this « ambulatory usability » goes far beyond its weight or shape. It requires a specific, tactile assessment of how the device integrates with movement.
The key is to simulate the real-world use case. It’s not just about how it feels when you first pick it up in a shop, but how it performs during the « pocket-to-puff » journey. This involves assessing its grip stability, how its activation mechanism works under pressure, and how easily you can orient it without looking. A truly great commuter pod feels like a natural extension of your hand, not an awkward object you have to wrestle with.
To move from subjective feel to an objective analysis, you can use a simple three-part test. This « ergonomic triangle » provides a structured way to determine if a device is genuinely built for a life in motion.
Your Action Plan: The One-Handed Usability Test
- The Grip Test: Hold the device in your dominant hand for a full minute. Does its shape naturally guide your thumb and forefinger? Do textured surfaces prevent it from slipping? A well-balanced pod should have a weight between 25-45g and feel secure without you needing to clench your hand.
- The Activation Test: While walking, attempt 10 consecutive puffs. If it’s draw-activated, does it fire instantly without delay or accidental firing in your pocket? If it’s button-activated, is the button placed where your thumb naturally rests, without forcing you to change your grip?
- The Mouthpiece Journey Test: Place the device in your pocket, then retrieve it and bring it to your mouth without looking. A good design features a tactilely distinct mouthpiece (e.g., textured or contoured) and a non-symmetrical body that allows you to orient it by feel alone, ensuring it’s always the right way up.
The Build Quality Signs That Predict Whether a £20 Pod Kit Will Last 6 Months
In the sub-£20 category, device longevity can feel like a lottery. Two pods that look nearly identical can have vastly different lifespans. One might last a year, while the other develops a wobbly port or a loose connection within weeks. The difference isn’t luck; it’s in the small, often overlooked details of manufacturing and assembly. Learning to spot these tells is key to getting the most value for your money.
The internal battery itself has a finite lifespan; industry testing reveals most can handle 300 to 500 charge cycles before their performance noticeably dips. For a daily commuter charging once a day, this means even a good battery will begin to degrade in about a year. However, it’s the external failure points—the port, the pod connection, and the shell—that often kill a budget device long before the battery does. A quick physical inspection, focusing on these three areas, can reveal a surprising amount about how well a device will hold up to the rigours of daily use.
Your Action Plan: The 3-Point Inspection Test for Budget Pods
- Port Inspection: Examine the USB-C port closely. Insert and remove a cable five times. It should feel firm with zero wobble or play. Look inside the port: are the metal contacts straight and clean? The port housing should sit perfectly flush with the body, with no gaps that could allow pocket lint and dust to enter.
- Pod Connection Test: Remove and re-attach the pod ten times. The magnets should be strong, offering a satisfying ‘click’ and requiring a deliberate pull to remove. The pod should not fall out when the device is inverted. If it’s a friction-fit, check for any signs of looseness after the test. Inspect the contact pins; gold plating is a sign of higher quality and better corrosion resistance.
- Seam & Shell Analysis: Run your fingernail along all the seams of the device’s body. Are there any sharp edges or noticeable gaps? Gently try to flex the body. A solid, unibody construction will feel rigid, while cheaper, multi-part plastic shells will creak and flex. Visible seams between the battery section and the top housing often indicate a weaker assembly that can loosen over time.
How to Make Your Compact Pod Last 20% Longer Between Charges?
While choosing the right hardware is crucial, the way you use your device has a massive impact on daily battery life. Many vapers unknowingly drain their batteries faster than necessary through their choice of components and inhalation habits. By making a few strategic adjustments—a practice we can call « battery budgeting »—you can often stretch the runtime of your existing device by 20% or more, potentially turning a pod that dies at 4 PM into one that lasts until you get home.
These optimisations work by reducing the amount of power the device needs to draw for each puff. It’s a combination of physics and technique. A higher resistance coil demands less current, thinner e-liquid vaporises with less energy, and a more controlled inhalation style prevents the battery from being subjected to constant high-drain situations. Each change contributes a small saving, but together, they form a powerful trinity of battery optimization.
Your Action Plan: The Vaper’s Trinity Battery Optimization Guide
- Coil Resistance Optimization: This is the single biggest change you can make. Switching to a higher resistance coil (e.g., 1.2Ω instead of 0.8Ω) can save approximately 33% power per puff because it demands exponentially less current from the battery.
- E-Liquid Viscosity Selection: Use a 50/50 PG/VG ratio e-liquid instead of high-VG blends. Thinner liquid wicks more efficiently and vaporises with less heat, reducing the power required from the coil and preventing power spikes from near-dry hits.
- Inhalation Technique Adjustment: Take shorter, 2-3 second puffs instead of long 5+ second draws. More importantly, wait 20-30 seconds between puffs. This allows the coil to cool, reducing thermal stress and the power needed to bring it back to temperature. Avoid chain-vaping, which forces the device into a continuous high-power state.
Case Study: The 20-80% Battery Rule
For long-term device health, battery research shows that keeping lithium-ion cells within the 20-80% charge window can dramatically extend their total lifespan. Instead of running the battery down to 0% and charging to 100%, users who practice ‘partial charging’—plugging in around 20-30% and unplugging at 80%—can get 40-60% more total charge cycles before the battery’s capacity degrades. This is because it reduces the voltage stress on the cell at both the empty and full extremes. For a commuter, this translates to a pod lasting 9-12 months instead of just 6-8 under the same daily usage.
Why Mini Pod Systems Create 70% Less Visible Vapour Than Sub-Ohm Tanks?
The difference in vapour production between a discreet mini pod and a massive sub-ohm tank is not accidental; it’s a direct result of their fundamentally different engineering goals. One is designed for efficiency and stealth, the other for raw power and visual effect. The core of this difference lies in the power they use and the airflow they allow.
It’s an analogy of fuel consumption. A mini pod system is like an efficient city car, sipping fuel to get from A to B. A sub-ohm tank is like a drag racer, flooring the accelerator to burn as much fuel as possible in a spectacular fashion. The technical data confirms this: mini pod systems typically operate at 9-15 watts with tight, restricted airflow and high-resistance coils (1.0-1.2Ω). This combination heats a small amount of e-liquid efficiently to produce a modest, quickly dissipating vapour, similar to the smoke from a traditional cigarette.
In stark contrast, sub-ohm tanks are power-hungry, running anywhere from 40 to over 80 watts. They pair this high power with very low-resistance coils (0.15-0.5Ω) and wide-open airflow channels. This setup is designed to vaporise a large volume of e-liquid at once, creating the dense, lingering clouds they are known for. For the commuter, the pod system’s efficiency is a feature, not a bug, enabling the discretion necessary for a professional environment.
Which Pod Systems Have Pressure Equalization Valves for Air Travel?
The fear of a leaky pod in a carry-on bag is a common concern for any vaper who travels. Many users search for pods with special « pressure equalization valves, » but this is a misunderstanding of how manufacturers have solved the problem. No mainstream pod systems feature dedicated barometric valves like those found in some high-end waterproof containers.
Instead, « leak-proofing » for air travel is achieved through clever, passive engineering design. The key is in managing the air that is already inside the pod. As an aircraft climbs to cruising altitude, the cabin pressure drops, causing the air trapped in your pod’s reservoir to expand. This expansion is what forces e-liquid out through seals and airflow holes. Modern leak-resistant designs are built to anticipate and mitigate this effect.
Case Study: Cabin Pressure and Pod Design
Aviation-related testing reveals that the most effective anti-leak feature is top-airflow architecture. In these designs, the air intake is positioned above the coil and liquid reservoir. When the internal air expands during ascent, it pushes upwards, away from the liquid and safely out of the airflow channel. This is in contrast to bottom-airflow designs, where expanding air has to bubble up through the e-liquid, pushing it out. As a result, pods with top-airflow can demonstrate 60-70% lower leak rates during flights. Other crucial features include multiple silicone seals and top-fill systems that keep the liquid level below the main airflow path.
While no pod is 100% leak-proof, you can dramatically reduce the risk by choosing a well-designed pod and following a strict pre-flight protocol.
Your Action Plan: The Flight-Ready Pod Preparation Checklist
- Pre-Flight Prep: Only fill the pod to 50-70% capacity to leave room for air expansion. A factory-sealed, unopened pod is also a great option. Five minutes before takeoff, slightly detach the pod from the device to manually equalize pressure.
- Storage Strategy: Place the detached pod upside-down in a small zip-lock bag. Put a folded piece of paper towel under the mouthpiece to catch any minor droplets. Always store your carry-on upright.
- Post-Landing Protocol: Wait 10 minutes after landing for cabin pressure to normalize before reassembling. Wipe any condensation from the pod base and device contacts, and take a couple of gentle « primer puffs » (without firing) to clear the airway before use.
Key takeaways
- Stop searching for a single magic device; build a resilient ‘vaping ecosystem’ with redundancy and planned charging.
- True value in a budget pod lies in its physical construction. Master the 3-point inspection of its port, pod connection, and shell seams.
- You can actively extend your battery life by over 20% through optimization: use higher resistance coils (1.2Ω), thinner 50/50 e-liquids, and a more disciplined puffing technique.
How to Vape at Work Without Your Colleagues Knowing You’ve Left Your Desk?
For the professional commuter, discretion is paramount. The goal is not to hide an activity, but to be considerate of colleagues and the work environment. A huge cloud of vapour is disruptive and unprofessional. The key to low-impact vaping at work lies in a combination of the right hardware (a mini pod system, as discussed) and, more importantly, the right technique. The aim is to produce as little visible vapour as possible upon exhalation.
This is where understanding vapour absorption becomes a practical skill. Vapour is composed of aerosolized droplets. The longer these droplets remain in your respiratory system, the more they are absorbed, and the less is visible when you exhale. A standard puff and quick exhale leaves most of the vapour unabsorbed. A more patient, controlled technique, however, can result in a nearly invisible exhale.
This « stealth » method requires practice to perfect but is the ultimate tool for discreet vaping. It’s a two-stage inhalation process that maximizes the time vapour spends in your lungs before you exhale. When done correctly, it allows for a satisfying puff with almost zero social footprint.
Your Action Plan: The Zero-Vapour Stealth Technique
- Step 1: The Initial Draw: Take a small, controlled 2-second puff, drawing the vapour only into your mouth, not your lungs. This should be about half the strength of a normal puff to minimize the initial vapour volume.
- Step 2: The Second Inhale: Immediately after taking your lips off the device, take a second, full, deep breath of fresh air through your nose or mouth. This pushes the vapour from your mouth down into your lungs and heavily dilutes it.
- Step 3: The Hold & Exhale: Hold this combined breath for 5-10 seconds. This gives the vapour droplets maximum time to absorb. Finally, exhale slowly and gently through your nose. The result should be little to no visible cloud. Practice this in private to perfect the timing.
Armed with this analytical framework, you are no longer just a consumer at the mercy of marketing hype. You are a systems operator. You can now analyze any device, build a strategy that fits your commute, and implement techniques that guarantee your pod works for you, not the other way around. The power is back in your hands.