Accessories & Coils
The difference between a satisfying vape and a frustrating experience often comes down to accessories most users take for granted. A coil that lasts three weeks versus one that burns out in four days, a battery that serves you for two years instead of dying after three months, or a drip tip that stays comfortably cool instead of burning your lips—these aren’t matters of luck. They’re the result of understanding how these components work and how to maintain them properly.
This resource brings together everything you need to know about the accessories and coils that power your vaping experience. Whether you’re trying to extend coil lifespan, avoid battery safety hazards, choose the right materials, or simply understand why certain components fail prematurely, the answers lie in grasping a few fundamental principles. Let’s break down each component system to help you make informed decisions and get the most from your device.
Understanding Vape Coils: The Heart of Your Device
Your coil determines everything from flavour quality to vapour production, yet it remains one of the most misunderstood components in vaping. This small heating element transforms e-liquid into vapour, but its performance depends on multiple interacting factors that many users never consider.
How Coils Work and Why They Matter
At its core, a vape coil is simply a resistance wire wrapped around wicking material, typically cotton. When electricity flows through the wire, resistance creates heat, which vaporizes the e-liquid absorbed by the wick. This seemingly simple process involves precise temperature control—too cool and you get weak flavour, too hot and you burn the cotton, creating that unmistakable acrid taste.
The wire material, thickness (gauge), number of wraps, and inner diameter all combine to create a specific resistance value measured in ohms. This resistance determines how much power the coil requires and how it behaves at different wattages. Think of it like a light bulb: the filament design determines brightness, heat output, and lifespan.
Signs Your Coil Needs Replacement
Coils don’t last forever, but recognizing when they’re truly spent versus just needing adjustment can save you money. The three most reliable indicators are taste changes, visible discolouration, and performance degradation.
A burnt or muted flavour is often the first sign, caused by caramelized e-liquid residue accumulating on the coil. This buildup, called “gunk,” insulates the wire and prevents proper heat transfer. You might also notice a persistent metallic taste, indicating the wire itself is degrading. Visually, fresh coils appear bright and clean, while spent ones show dark brown or black deposits that won’t rinse away.
Factors That Affect Coil Lifespan
The variation in coil longevity—from days to weeks—isn’t random. E-liquid composition plays the largest role: sweetener-heavy liquids leave more residue, with some dessert flavours destroying coils five times faster than tobacco or unflavoured bases. High VG ratios (vegetable glycerin) are thicker and slower to wick, potentially causing dry hits that damage cotton.
Your vaping habits matter equally. Chain vaping doesn’t allow time for the wick to re-saturate between puffs, leading to burnt cotton. Wattage settings also influence lifespan—running a coil above its rated range accelerates degradation, while staying slightly below the maximum often extends life by a third or more.
Coil Types and Materials: Finding Your Perfect Match
Not all coils deliver the same experience. The material and construction method fundamentally alter flavour quality, ramp-up time, vapour production, and compatibility with different vaping styles.
Mesh Coils vs Traditional Wire Coils
Mesh coils use a flat strip of metal with tiny perforations instead of wrapped wire, creating dramatically more surface area in contact with the wick. This design heats e-liquid more evenly and rapidly, producing what many describe as “restaurant-quality” flavour clarity—you can distinguish individual notes in complex blends rather than getting a muddled impression.
Traditional wire coils, typically featuring cylindrical wraps, offer different advantages. They’re often more forgiving with high-PG liquids and lower wattages, making them preferred for mouth-to-lung (MTL) vaping. The ramp-up time is slightly longer, but some users prefer the gradual warmth. For cloud chasers and flavour enthusiasts using high-VG liquids, mesh typically outperforms wire, especially at sub-ohm resistances.
Kanthal: The Reliable Standard
Kanthal, an iron-chromium-aluminium alloy, has dominated vaping for over a decade because it simply works. It’s affordable, widely compatible, and delivers clean flavour when fresh. Kanthal A1 is the most common variant, offering excellent resistance stability and the ability to handle repeated dry-burning for cleaning.
The gauge matters significantly: 24-gauge wire (thicker) heats more slowly but holds more mass, ideal for higher wattages. The 28-gauge option (thinner) suits low-wattage MTL setups, heating quickly with less power. One limitation: Kanthal’s resistance doesn’t change predictably with temperature, making it incompatible with temperature control modes found on advanced devices.
Stainless Steel for Temperature Control
Stainless steel (SS) varieties—particularly SS316L—offer a unique advantage: their resistance increases predictably as they heat. Modern devices use this property for temperature control (TC) mode, maintaining a precise temperature rather than just delivering constant wattage. This prevents dry hits and burnt cotton more effectively than wattage mode alone.
Beyond TC capability, many vapers report stainless steel delivers the purest flavour profile, with less metallic interference than Kanthal. However, dry-burning stainless steel requires caution—excessive heat can create chromium oxide, a compound you don’t want to inhale. Gentle cleaning or simply replacing the coil is safer than aggressive dry-burning.
Ceramic Coils: Promise and Controversy
Ceramic coils replace cotton wicking with porous ceramic material, marketed as cleaner and longer-lasting. The ceramic’s heat resistance means it won’t burn like cotton, theoretically eliminating dry hits. Some manufacturers claim superior flavour purity since ceramic is chemically inert.
The controversy stems from durability concerns and health questions. Ceramic can crack under thermal stress, and there’s ongoing debate about whether microscopic ceramic particles could be inhaled. While some users swear by the clean taste, others find ceramic coils deliver muted flavour compared to well-maintained mesh. The cleaning process also differs—aggressive scrubbing can damage the porous structure.
Coil Installation and Priming: Avoiding Costly Mistakes
Even premium coils fail instantly if installed incorrectly. The first few minutes after installation are critical—this is when most premature coil deaths occur, often from entirely preventable mistakes.
Proper Priming Techniques
Priming saturates the cotton wick before the first firing, preventing immediate burning. The process takes just five minutes but can mean the difference between a coil lasting days or weeks. Start by manually dripping e-liquid directly onto the visible cotton ports until they appear fully saturated but not dripping.
After installing the primed coil in your tank, fill with e-liquid and wait at least five minutes before vaping. This allows capillary action to draw liquid throughout the internal wicking. For the first few puffs, start at the lower end of the coil’s wattage range, gradually increasing. Think of it like warming up an engine—full power immediately creates stress that shortens lifespan.
Installation Best Practices
Most coils screw into the tank base, and finding the right tightness is crucial. Too loose creates electrical resistance or leaking; too tight can damage the threads or compress the o-ring improperly. The rule: finger-tight plus a quarter turn. You should feel firm resistance without needing tools or excessive force.
Before installing, inspect the coil’s threads and o-rings for defects. A misshapen o-ring or crossed threads cause the majority of “short circuit” error messages. If you encounter this error, remove the coil, clean the threading, check for damage, and reinstall carefully. The coil should sit flush against the base with no gaps.
Compatibility and Resistance Considerations
Not all coils fit all tanks, even from the same manufacturer. Check the coil family designation (often printed on the coil body) against your tank’s specifications. Using incompatible coils can create dangerous short circuits or simply prevent the device from firing.
Resistance matching matters too. If your device has a maximum output of 80 watts, a 0.15-ohm coil rated for 90-110 watts will never perform optimally. Conversely, using a 1.2-ohm MTL coil on a powerful sub-ohm device wastes the hardware’s potential. Match coil resistance to both your device’s capabilities and your preferred vaping style.
Battery Safety and Longevity: Essential Knowledge for Every Vaper
Batteries receive less attention than they deserve until something goes wrong. Understanding proper battery care prevents both safety hazards and the frustration of premature replacement.
Recognizing Dangerous Counterfeits
Counterfeit batteries represent one of vaping’s most serious safety risks. Four visual signs help identify fakes: unusually light weight, poorly printed labels with spelling errors, incorrect colour shades compared to authentic versions, and suspicious pricing (genuine high-drain cells have consistent market prices).
Always purchase batteries from established vendors who verify authenticity. Counterfeits often have inflated capacity ratings—a cell claiming 4000mAh in 18650 format should raise immediate suspicion, as genuine high-drain cells typically max out around 3000mAh. When performance seems too good to be true, it almost always is.
Charging Practices That Extend Battery Life
How you charge matters more than most users realize. Overnight charging keeps batteries at 100% capacity for hours, accelerating chemical degradation. While most modern chargers stop active charging at full capacity, the battery still undergoes stress from being held at maximum voltage.
Charging through your mod’s USB port is convenient but less optimal than using a dedicated external charger. The mod’s charging circuit manages multiple tasks simultaneously, often charging unevenly or more slowly. External chargers typically offer better balancing, especially for dual-battery setups, and allow visual monitoring of the charging process.
The 30-80% Rule Explained
Lithium-ion batteries last longest when kept between 30% and 80% charge rather than cycling from empty to full. Letting batteries drain completely or charging to absolute maximum both create chemical stress. Think of it like athletic training—moderate exertion extends performance, while constantly pushing to exhaustion causes burnout.
In practice, this means charging when your device indicates 30-40% remaining and removing batteries from the charger once they reach 80% if maximum longevity is your priority. For daily convenience, occasional full charges won’t destroy your batteries, but making 30-80% your normal range can extend lifespan by months.
Dual Battery Management
Dual-battery mods require special attention. Always purchase batteries in identical pairs and keep them “married”—used and charged together exclusively. This prevents uneven wear that forces one battery to work harder than its partner, potentially leading to venting or reduced performance.
Periodically swap battery positions (left-right or top-bottom depending on your mod) to ensure even wear from slight differences in the mod’s circuitry. When one battery in a married pair fails or shows damage, retire both. Using a fresh battery with a worn partner creates dangerous imbalances.
Choosing and Using the Right Charger
Your charger is just as important as the batteries themselves. Cheap chargers cause the majority of battery-related fires and premature cell death.
External vs USB Charging
External chargers designed specifically for cylindrical cells (18650, 21700, etc.) offer precise monitoring and balanced charging. They display voltage, current, and often internal resistance—data that helps predict when batteries need replacement. Most quality external chargers also include overcharge protection, short-circuit prevention, and temperature monitoring.
USB charging through your device works for integrated batteries or occasional use with removable cells, but shouldn’t be your primary charging method for high-drain batteries. The exception: devices specifically designed with robust charging circuits, which usually charge noticeably slower but more safely than basic USB implementations.
Reading Charger Displays
Modern chargers provide valuable information if you know how to interpret it. Voltage readings show charge state: fully charged lithium cells read 4.2 volts, while 3.7 volts indicates roughly 40% capacity. If a battery won’t charge beyond 3.9 volts or takes dramatically longer than its partner, it’s likely degraded and needs replacement.
Internal resistance measurements (shown in milliohms on advanced chargers) reveal battery health. New cells typically measure 15-30 milliohms, while readings above 100 milliohms indicate significant degradation. This metric predicts failure before voltage irregularities appear, giving you advance warning to order replacements.
Safety Features to Look For
A quality charger should include multiple protection mechanisms. Reverse polarity protection prevents damage if batteries are inserted incorrectly. Overcharge protection stops current flow once cells reach 4.2 volts. Temperature monitoring shuts down charging if cells or the charger itself overheat.
Budget chargers often lack these safeguards, representing the single most dangerous false economy in vaping. A reliable charger costs roughly the same as five premium coils but protects investments worth hundreds and prevents potential fire hazards. The difference between a safe charger and a dangerous one isn’t subtle—it’s the difference between regulated electronics and basic wire connections.
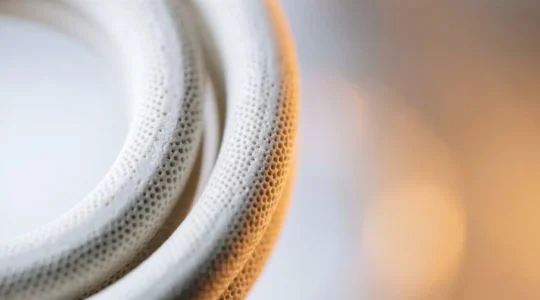
Drip Tips: More Than Just a Mouthpiece
The drip tip—your device’s mouthpiece—seems like a minor accessory, yet it significantly affects comfort, temperature, and hygiene. Material choice and design influence every session.
Material Choices and Their Impact
Resin drip tips have gained popularity because they stay cool even during extended chain vaping. Resin’s low thermal conductivity means heat doesn’t transfer from the vapour to the tip’s exterior. Metal tips (stainless steel, aluminium) conduct heat rapidly, becoming uncomfortable or even burning lips after three or four consecutive puffs at high wattage.
The aesthetic appeal of resin comes with durability considerations. Quality resin remains stable and colourfast for years, but counterfeit versions yellow, crack, or degrade within weeks. Authentic resin tips feature uniform colour throughout the material, while fakes often show colour only on the surface, revealing lighter material where drilled or cut.
Bore Size and Vaping Style
Bore diameter (the internal passage width) dramatically affects draw resistance and vapour temperature. Narrow-bore tips (3-5mm) create restricted airflow ideal for mouth-to-lung vaping, concentrating flavour and slightly cooling vapour by reducing volume. They mimic the draw resistance of traditional cigarettes.
Wide-bore tips (8-12mm) suit direct-lung vaping and cloud production, allowing massive vapour volume with minimal resistance. The increased airflow also cools vapour more effectively through dilution, though the exterior may still heat up with metal tips. Your vaping style should dictate bore choice—forcing a wide-bore setup for MTL vaping creates a dissatisfying, airy draw.
Maintenance and Hygiene
Drip tips contact your lips hundreds of times daily, yet most users rarely clean them properly. The interior accumulates condensed e-liquid residue and bacteria from saliva. Weekly cleaning with warm water and mild soap prevents buildup that affects flavour and hygiene.
Remove the drip tip and inspect the o-rings that seal it to your tank. These thin rubber rings prevent leaking but degrade over time. If your drip tip feels loose or you notice condensation around the connection, replace the o-rings—they cost pennies but prevent frustrating leaks. Keep spares in your vape kit; they’re the most frequently replaced small component.
Advanced Coil Building for Enthusiasts
Building your own coils offers complete control over resistance, flavour, and performance while reducing long-term costs. The learning curve is moderate, but the fundamentals are straightforward.
Wire Gauge and Wrap Mathematics
The relationship between wire gauge, wraps, and resistance follows predictable physics. Thicker wire (lower gauge number like 24G) has less resistance per length than thinner wire (28G). More wraps increase total resistance by adding length, while larger internal diameter (measured in millimetres) also increases resistance slightly by adding length to each wrap.
A practical example: six wraps of 24-gauge wire at 3mm inner diameter produces roughly 0.3 ohms in kanthal, while six wraps at 2.5mm might yield 0.25 ohms. This seems minor, but at 50 watts, that 0.05-ohm difference changes power delivery and heat distribution noticeably. Online coil calculators help predict resistance before building, preventing wasted wire and time.
Testing and Troubleshooting
The glow test reveals whether your coil heats evenly. After installing your coil (without cotton), pulse power briefly while watching in dim lighting. The wire should glow from the center outward evenly. Hotspots—areas that glow brighter or heat first—indicate uneven wraps or wire contact points.
Fix hotspots by gently squeezing coils with ceramic tweezers while pulsing power, which compresses wraps and evens out spacing. Never use metal tweezers while firing, as they complete the circuit and can create dangerous shorts. Once glowing uniformly, the coil is ready for wicking. This ten-second test prevents harsh hits and premature burning.
Wicking Density Optimization
Cotton amount determines how quickly e-liquid reaches the coil and how well the coil drains between puffs. Too little cotton can’t absorb enough liquid, causing flooding and spit-back. Too much restricts liquid flow, creating dry hits despite a full tank—this is the most common wicking error.
The sweet spot feels snug but movable through the coil. Thread cotton through, then pull gently—it should move with slight resistance but not bind. For RDAs (rebuildable dripping atomizers), trim cotton to just reach the deck without blocking airflow. For tanks, cotton should reach the juice channels without being stuffed tightly into them, allowing capillary action while preventing flooding.
Maintenance Practices That Save Money
Preventive maintenance extends the life of every component and prevents the frustrating failures that usually occur at the worst possible times.
O-Ring Replacement Schedule
Tank o-rings seal connections to prevent leaking, but silicone degrades over time from e-liquid exposure, temperature changes, and mechanical stress. Most manufacturers recommend replacement every three to six months depending on usage, though visible cracking or loss of elasticity means immediate replacement regardless of timeline.
Keep a spare o-ring set for each tank you own. These tiny rings cost very little but prevent the frustration of a pocket full of e-liquid from a failed seal. When replacing, lightly lubricate the new o-ring with e-liquid—this helps it seat properly and prevents tearing during installation.
Proper Storage Techniques
Unopened coils remain viable for years if stored correctly, but improper storage ruins them before first use. Keep coils in their sealed packaging in a cool, dry place away from direct sunlight. Extreme temperature swings can damage the cotton wicking even before installation.
For devices and batteries, avoid leaving them in cars where temperatures fluctuate dramatically. Store batteries in protective cases rather than loose in pockets or bags—the pocket mistake that causes battery venting is contact with metal objects (coins, keys) that complete a circuit and cause rapid discharge or venting. A simple plastic case prevents this entirely.
Cleaning Routines
Weekly quick-cleaning maintains performance between deep cleans. Rinse tanks with warm water, wipe down your mod’s exterior, and inspect connections for e-liquid buildup. Monthly, perform a thorough cleaning: disassemble tanks completely, clean threading with cotton swabs, and check all o-rings and seals.
For drip tips and mouthpieces, weekly alcohol wipes or soap and water eliminate the bacterial buildup most users ignore. This isn’t just about hygiene—residue buildup affects flavour purity. The two minutes spent cleaning each week prevents the gradual flavour degradation users often attribute to “flavour fatigue” when it’s actually just dirty components.
Mastering these accessories and components transforms vaping from a frustrating experience of burnt coils and dead batteries into a reliable, economical, and satisfying routine. Each element—from understanding why mesh heats differently than wire to knowing when your charger display warns of battery degradation—builds toward complete control over your device’s performance and longevity. The investment of time learning these fundamentals pays dividends in both safety and satisfaction.
Ceramic Coils: Safer Vaping Technology or a Vaper’s Health Controversy?
Ceramic coils offer superior flavour purity and longevity due to their material properties, but their safety and performance depend entirely on manufacturing quality and using the correct e-liquid. The risk…
Read more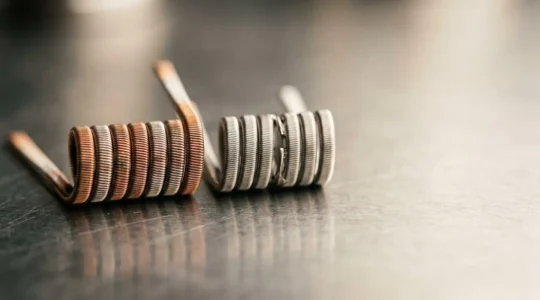
Why Does Your Hand-Wrapped Coil Taste Better Than the £5 Pre-Built Version?
Building coils isn’t about saving money; it’s about seizing control of the very physics of flavour. A coil’s performance isn’t magic; it’s a direct result of its mass, surface area,…
Read more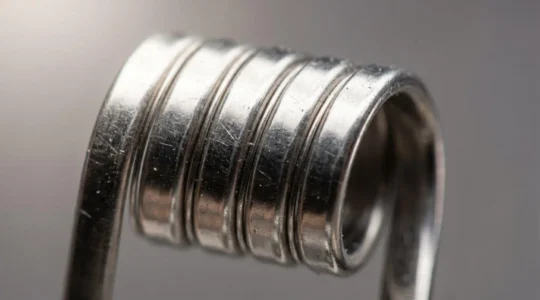
Why Does Stainless Steel Work in Temperature Control When Kanthal Doesn’t?
Mastering temperature control has less to do with your mod’s brand and more to do with understanding the unique physics of Stainless Steel wire. Stainless Steel’s resistance changes predictably with…
Read more
Why Does Your Kanthal Coil Taste Metallic While Your Friend’s Tastes Clean?
That frustrating metallic taste from your Kanthal coil isn’t a random flaw or a sign of ‘vaper’s tongue’. It is a specific, predictable signal from the material itself, indicating that…
Read more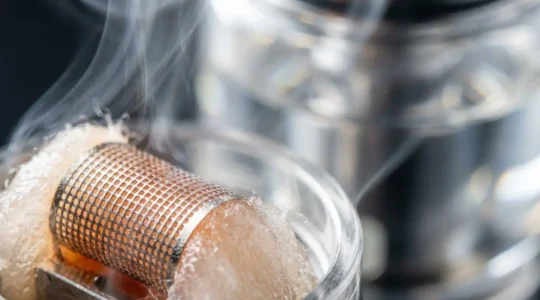
Why Do Mesh Coils Deliver Restaurant-Quality Flavour While Wire Coils Taste Muted?
The secret to superior flavour isn’t just that mesh coils are bigger; it’s that they ‘cook’ e-liquid with the precision of a professional chef. Traditional wire coils act like an…
Read more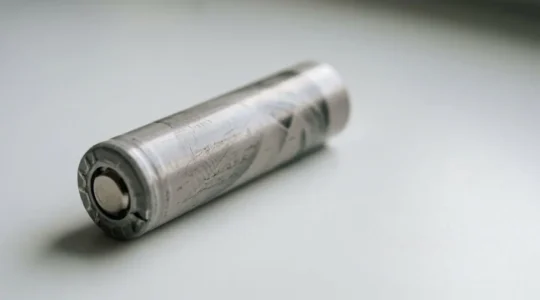
Why Your Vape Batteries Die in 6 Months (And How to Make Them Last 2 Years)
The frustrating cycle of replacing vape batteries every few months isn’t a battery problem; it’s a charging problem you can solve. Charging via your mod’s USB port and using cheap,…
Read more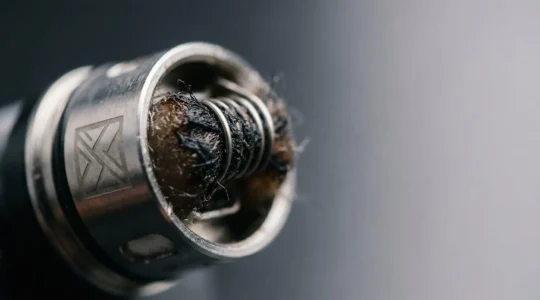
Why Does Your New Coil Taste Burnt From the Very First Puff?
A new coil tasting burnt immediately is not a sign of a faulty product, but a symptom of a preventable ‘catastrophic failure’ during the installation and priming phase. Uneven cotton…
Read more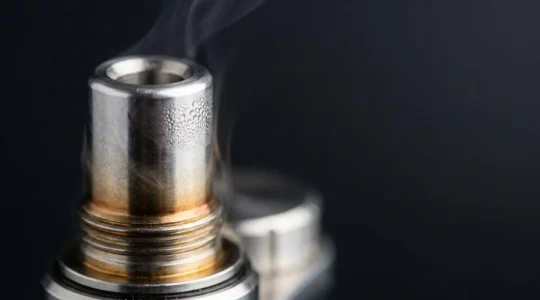
Why Does Your Metal Drip Tip Burn Your Lips After 3 Chain Puffs?
In summary: Your metal drip tip burns your lips because of high thermal conductivity; materials like resin are 80 times less conductive and stay cool. The inner width (bore) of…
Read more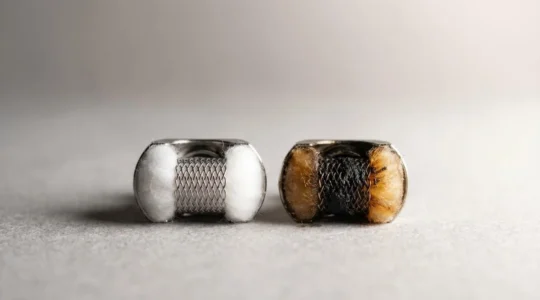
Why Does Your Coil Burn Out in 4 Days When Others Last 3 Weeks?
In summary: Sweet e-liquids are the primary cause of premature coil failure due to sweetener caramelization, not just because they’re ‘dirty’. A meticulous 5-minute priming process, including ‘primer puffs’ and…
Read more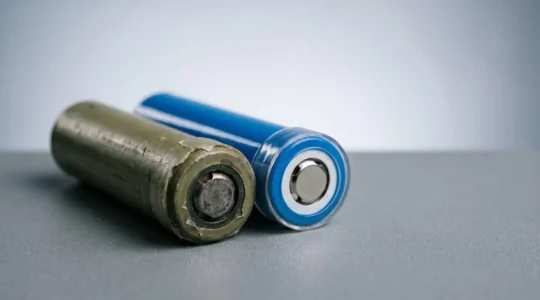
Why Do Vape Batteries Die in Months, Not Years? A Specialist’s Guide
Contrary to popular belief, your vape battery’s short life isn’t a sign of a cheap product but a misunderstanding of its sensitive chemical system. The primary causes of early battery…
Read more