In summary:
- Stop treating your box mod like a simple pen; it’s a performance system where every part must work in synergy.
- Wattage is meaningless without matching it to your coil’s resistance and mass—this relationship is called heat flux.
- Battery choice isn’t about capacity alone; it’s a trade-off between power output (CDR) and runtime, crucial for safety and performance.
- The quality of your mod’s chipset, not its maximum wattage, determines real-world vapour production and flavour consistency.
- Learn to read data-driven signs like « resistance creep » to know exactly when to change your coil, long before it tastes burnt.
So, you’ve finally made the leap. You’ve upgraded from a simple, no-fuss pod system to a powerful, feature-rich box mod, ready to chase incredible flavour and impressive clouds. But instead of a glorious upgrade, you’re met with frustration. Your coils are burning out in days, the flavour is muted, or your brand-new 200W device feels weaker than you expected. You’ve scoured the web, and the advice is always the same: « start with low wattage » or « prime your coils. » While true, this advice barely scratches the surface.
These tips treat the symptom, not the cause. They fail to address the fundamental shift in thinking required when moving to a high-performance device. A box mod isn’t just a bigger vape pen; it’s a sophisticated ecosystem where the battery, chipset, coil, and even the e-liquid must work in perfect harmony. The secret isn’t about following a generic set of rules, but about understanding the principles of this system.
What if the key wasn’t just the wattage number, but the heat flux it generates on your specific coil? What if your battery choice was actively sabotaging your mod’s performance? This guide is built on that premise. We’re moving beyond the platitudes to give you the technical confidence of a competitive vaper. We will deconstruct the entire system, from power curves to battery physics, so you can diagnose issues, optimise for flavour, and finally unlock the true potential of your investment.
This comprehensive guide will walk you through the essential knowledge needed to master your device. Below is a summary of the key areas we will cover to transform your vaping experience from frustrating to flawless.
Summary: A Vaper’s Guide to Box Mod Performance
- Why Your New Box Mod Needs 3x More Attention Than Your Old Pod System?
- How to Set Wattage Curves That Match Your Thick Dessert E-Liquid?
- Single or Dual Battery Mod: Which Lasts a Full Workday Without Charging?
- The Firmware Update Mistake That Permanently Destroys £80 Box Mods
- When to Replace Your Mod’s Coil: 5 Signs You’re Vaping on Burnt Cotton
- Why Wattage Means Nothing Without the Right Coil Resistance?
- How to Choose 18650 Batteries That Won’t Overheat in Your Sub-Ohm Mod?
- Why Does Your 200W Mod Produce Less Vapour Than Your Friend’s 80W Setup?
Why Your New Box Mod Needs 3x More Attention Than Your Old Pod System?
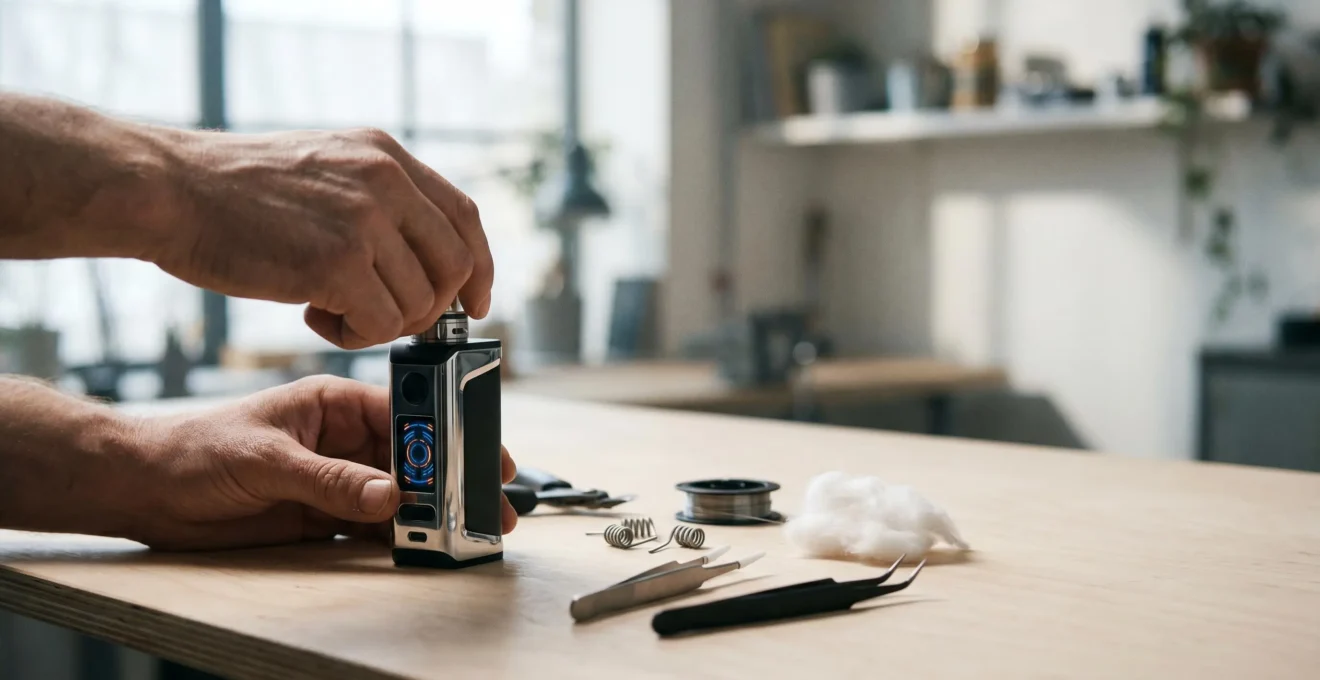
The transition from a closed pod system to an open box mod is like switching from an automatic car to a manual-transmission race car. A pod is a sealed unit where the manufacturer has made all the decisions for you; the power, coil, and airflow are fixed for a consistent, if limited, experience. A box mod hands you the controls to the entire engine. It’s not just a more powerful battery; it’s a modular platform where you are the system integrator. Every choice—from the coil material to the VG/PG ratio of your e-liquid—has a cascading effect on performance and safety.
This is why your new device demands more attention. An incorrect wattage setting doesn’t just result in a bad taste; it can permanently burn the cotton wick, ruin a coil in seconds, and deliver an unpleasantly harsh ‘dry hit’. The illustration below visualizes this leap from a simple, self-contained product to a complex, customizable ecosystem. On one side, the simplicity of the pod; on the other, the interconnected components of the mod that you now control.
Mastering this ecosystem begins with a systematic setup process. You need to think about system synergy, ensuring every component is compatible and configured correctly. Forgetting to match your power settings to your coil’s resistance is the number one rookie mistake. This isn’t just about preference; it’s about physics. The checklist below provides a structured approach to follow every time you install a new coil or set up your mod for the first time, ensuring safety and optimal performance from the very first puff.
Your 5-Point System Check for Every New Box Mod Setup
- Power Management: Set wattage, voltage, or temperature control according to the coil specifications printed on the coil body or its packaging. Never guess.
- Coil Selection: Identify the coil’s resistance (Ω), mass, and material type (e.g., Kanthal, Stainless Steel) to verify its compatibility with your mod and intended power range.
- E-Liquid Match: Choose a VG/PG ratio appropriate for your coil. A 70/30 VG/PG blend is ideal for sub-ohm coils (below 1.0Ω), while 50/50 works best for MTL coils (above 1.0Ω).
- Airflow Configuration: Adjust the airflow to match your coil and wattage. Wide-open Direct-to-Lung (DTL) airflow is needed for high power, while tighter Mouth-to-Lung (MTL) airflow suits lower power.
- Battery Safety: Check your battery’s amperage rating (CDR), ensure its wrap is intact, and never let it discharge below 3.2V. In dual-cell mods, always use a « married » pair of batteries.
How to Set Wattage Curves That Match Your Thick Dessert E-Liquid?
Dessert and bakery-flavoured e-liquids are notoriously tough on coils. Their high viscosity (from a high VG ratio) and significant sweetener content create a perfect storm for premature coil failure. A standard, flat wattage setting often struggles to vaporise these thick liquids efficiently without scorching the sweeteners, leading to that dreaded « caramelized gunk » taste. This is where mastering your mod’s Wattage Curve (or VPC – Variable Power Curve) mode becomes a game-changer. This feature allows you to control the power output second-by-second throughout your puff.
The goal is to create a power curve that delivers a short, high-power burst at the beginning to overcome the coil’s ramp-up time and pre-heat the thick liquid. This initial burst should be immediately followed by a drop to a stable, slightly lower wattage for the remainder of the puff. This « pre-heat punch » vaporises the liquid effectively without giving the sweeteners time to burn onto the coil. For example, for a coil rated 50-60W, you might set the first second to 65W, then have it drop to 55W for the next 3-4 seconds. This technique significantly improves flavour and extends coil life with sweet liquids, as coil performance research shows that residue buildup accelerates at temperatures above the optimal range.
Without a curve, you’re forced into a compromise: either a wattage high enough to cause scorching or one too low to produce a satisfying, flavourful vapour. The curve lets you have the best of both worlds. Experimentation is key. Start with a modest pre-heat (e.g., 5-10W above your normal setting for 0.5-1.0 seconds) and adjust from there. A properly tuned wattage curve provides a consistently warm, dense, and flavourful vape from start to finish, even with the most challenging high-VG dessert e-liquids.
Single or Dual Battery Mod: Which Lasts a Full Workday Without Charging?
The choice between a single and a dual battery mod is a critical decision that directly impacts portability, power, and, most importantly, battery life. The answer to whether a mod can last a full workday depends entirely on your vaping style and wattage demands. It’s a classic engineering trade-off: a single-battery mod offers a smaller, more pocket-friendly device, while a dual-battery mod provides significantly more power headroom and longevity, but at the cost of size and weight. A modern single-cell mod using a high-capacity 21700 battery can be a fantastic all-day option for a vaper who stays below 45W.
For high-wattage, sub-ohm vapers who consistently vape at 70W or more, a dual 18650 battery mod is almost non-negotiable for all-day performance. The dual-cell configuration doesn’t just double the capacity; it also reduces the strain on each individual battery. This leads to less voltage sag under load, cooler battery temperatures, and better overall efficiency. Running a single battery at its upper limit all day will drain it rapidly and degrade its long-term health, whereas two batteries sharing the load can operate comfortably within their specifications.
The following table, based on an in-depth analysis of battery configurations, breaks down the practical differences. It clearly illustrates how total energy (measured in Watt-hours, Wh) and recommended wattage ranges determine the ideal use case for each setup, helping you choose the right configuration to confidently last through your workday.
| Battery Configuration | Total Capacity (Wh) | Recommended Wattage Range | Estimated Workday Duration (8 hours) | Best Use Case |
|---|---|---|---|---|
| Single 21700 (e.g., 4000mAh) | ~14.8 Wh | 15W – 45W (MTL/RDL) | Full day at 30W average | Pocket-friendly, MTL/RDL vapers, lower wattage preference |
| Dual 18650 (e.g., 3000mAh each) | ~18.5 Wh | 50W – 150W (DTL) | Full day at 80W average | High-wattage DTL, better voltage stability, reduced battery strain |
The Firmware Update Mistake That Permanently Destroys £80 Box Mods
The ability to update your mod’s firmware is a powerful feature, offering bug fixes, improved efficiency, and sometimes even new functionality. However, it’s also one of the riskiest procedures you can perform. A failed firmware flash can « brick » your device, turning your expensive mod into nothing more than a paperweight. The most common and devastating mistake isn’t downloading the wrong file; it’s using the wrong USB cable and having an unstable connection. Most users grab any USB cable they have lying around, not realizing many are designed for charging only and lack the necessary data transfer lines.
When the update process begins, the software erases the mod’s current operating system before writing the new one. If the data connection is interrupted during this critical writing phase—even for a split second—the process fails, leaving the mod with no functional software. This is known as a « soft brick, » and it is often irreversible without specialized tools. This is not a theoretical risk; it’s a well-documented problem.
Case Study: The Primary Cause of Firmware Bricking
An analysis of common firmware update failures revealed that the primary cause of software-crippled devices is data transmission interruption. The most frequent error identified was users connecting their mods with cheap, charging-only USB cables that lack the proper data lines (D+ and D-). This causes the computer to lose recognition of the device mid-update. To prevent complete failure, manufacturers strongly recommend using only the original data cable supplied with the mod and ensuring batteries are removed before starting the process.
To avoid this catastrophe, you must treat a firmware update with the same precision as a surgical procedure. First, confirm you are downloading the correct firmware version for your specific hardware revision from the official manufacturer’s website only. Never use files from forums or third-party sources. Before connecting the mod, remove the batteries to prevent any power-related issues. Use a high-quality data cable (ideally the one included) and plug it into a stable USB 2.0 port on your computer, avoiding USB hubs. Finally, do not use the computer for any other tasks while the update is in progress. These steps may seem overly cautious, but they are your best defence against a costly mistake.
When to Replace Your Mod’s Coil: 5 Signs You’re Vaping on Burnt Cotton
The most common advice for changing a coil is to do it « when it tastes burnt. » This is reactive, not proactive. By the time you taste that acrid, peppery flavour of burnt cotton, you’ve already been inhaling unpleasant compounds for some time. A true enthusiast learns to spot the signs of a dying coil long before it reaches that point. It’s about moving from a subjective sense of taste to objective, data-driven diagnostics. Your mod and your senses provide all the data you need, if you know what to look for.
A fresh coil has a specific, stable electrical resistance. As you vape, especially with sweet e-liquids, residue (gunk) builds up on the wire. This buildup alters the coil’s properties, causing its resistance to slowly rise. This phenomenon is known as « resistance creep ». By locking your coil’s resistance when it’s new and cold, your mod allows you to monitor this change. A gradual increase from 0.15Ω to 0.19Ω, for example, is a clear indicator that the coil is nearing the end of its life, even if the flavour hasn’t completely turned.
Beyond resistance, your ears and taste buds can provide further clues. A healthy coil produces a clean, crisp sizzle, while a gunked-up coil will sound spitty and crackly. Learning to distinguish these auditory and sensory cues will allow you to change your coil at the perfect moment, ensuring every puff is as good as the first. Here are five data-driven signs to watch for:
- Resistance Creep: Lock your ‘cold resistance’ on a fresh coil. A gradual, steady increase (e.g., 0.15Ω becoming 0.19Ω) indicates gunk buildup and an impending burnt taste.
- The Sizzle Test (Auditory Diagnosis): A healthy coil makes a clean, crisp sizzle. A gunked coil sounds ‘spitty’ and ‘crackly’. A dry coil about to burn sounds raspy or hollow.
- Caramelized Gunk Taste: The flavour becomes overly sweet and muted. This is the taste of old, caramelized sweetener residue on the coil surface, a precursor to a burnt hit.
- Dry Hit Taste: The infamous acrid, peppery, and harsh flavour that signals the cotton wick has dried out and is actively burning. If you taste this, you’ve waited too long.
- Wicking Collapse Taste: A strange, damp, and slightly ‘cottony’ flavour. This suggests the wicking material has degraded and lost its structure, preventing it from efficiently drawing up e-liquid.
–
Why Wattage Means Nothing Without the Right Coil Resistance?
In the world of box mods, new vapers often fixate on one number: maximum wattage. They assume that higher wattage automatically equals more vapour and better flavour. This is a fundamental misunderstanding. Wattage is simply the raw electrical power being sent from the batteries. What truly matters is how that power is used by the coil. The critical concept that connects them is Heat Flux: the measure of heat density applied to the surface area of the coil wire. Think of it this way: 80 watts applied to a tiny, thin wire will make it glow white-hot instantly (very high heat flux), while the same 80 watts applied to a massive, thick, multi-strand coil will only warm it up gently (low heat flux).
Your coil’s resistance (measured in ohms, Ω) is directly related to its mass and surface area. A high-resistance coil (e.g., 1.2Ω) is typically made of thin wire, has less mass, and requires very little power (10-15W) to reach its optimal vaping temperature. A low-resistance, sub-ohm coil (e.g., 0.15Ω) is made of thick, complex wire, has significant mass, and needs a lot of power (80-100W) to achieve the same optimal temperature. Applying 80W to the 1.2Ω coil would instantly burn it, while applying 15W to the 0.15Ω coil would do almost nothing.
This is why wattage, in isolation, is a meaningless metric. It must always be considered in the context of the coil’s resistance. Each coil is designed to perform within a specific wattage range to achieve an ideal heat flux for efficient vaporisation. The table below, derived from a comprehensive sub-ohm vaping guide, illustrates this relationship, showing how different resistance levels are designed for completely different power ranges and vaping styles.
| Coil Resistance (Ω) | Recommended Wattage Range | Vaping Style | Heat Flux Characteristic |
|---|---|---|---|
| 1.6Ω – 1.8Ω (High resistance) | 8W – 15W | MTL (Mouth-to-lung) | Low heat flux, cooler vapor, longer coil life |
| 0.8Ω – 1.2Ω (Medium resistance) | 12W – 25W | RDL (Restricted direct-lung) | Moderate heat flux, balanced performance |
| 0.4Ω – 0.6Ω (Sub-ohm) | 25W – 60W | DTL (Direct-to-lung) | High heat flux, warmer vapor, dense clouds |
| 0.15Ω – 0.3Ω (Low sub-ohm) | 60W – 100W+ | High-power DTL | Very high heat flux, requires massive coil mass |
How to Choose 18650 Batteries That Won’t Overheat in Your Sub-Ohm Mod?
Battery safety is the most critical aspect of using a box mod, yet it’s widely misunderstood. Choosing a battery isn’t as simple as finding the highest capacity (mAh). For vapers, the most important rating is the Continuous Discharge Rating (CDR), measured in amps (A). This rating indicates the maximum current you can safely draw from the battery without it overheating. Using a battery with an insufficient CDR for your wattage and coil resistance is extremely dangerous and can lead to thermal runaway—a catastrophic battery failure.
You must understand the « Battery Triangle of Compromise »: for any given battery size like the 18650, you can only have two of the following three attributes: high capacity (long life), high CDR (high power output), or low internal resistance (efficiency). A 3500mAh battery will invariably have a low CDR (around 10A), making it suitable for a low-wattage flashlight but dangerously inadequate for a 100W sub-ohm vape. A proper vaping battery might have a lower capacity of 2800mAh but a much higher CDR of 25A or 30A. You can calculate the minimum CDR your vaping style requires with a simple formula: Amps = Watts / Volts. For a dual battery mod at 150W, the demand on each battery is 75W. At a low voltage of 3.2V, that’s over 23A per battery, demonstrating why high-CDR cells are essential.
Authenticity is also paramount. The market is flooded with counterfeit batteries and cells that have been « rewrapped » with dangerously exaggerated specifications. Always buy from reputable, dedicated vape or battery suppliers who source directly from manufacturers like Molicel, Sony/Murata, or Samsung. And finally, treat your battery wraps like the crucial safety feature they are. The entire metal can of the battery is the negative terminal; that thin plastic wrap is the only thing preventing a dead short. If a wrap is torn or nicked, do not use it until it’s been rewrapped—a simple and cheap procedure that can prevent a disaster.
Key Takeaways
- Your box mod is a system; its performance depends on the synergy between the mod, coil, batteries, and e-liquid, not just one setting.
- Heat Flux, not raw wattage, is the key to great flavour. You must match power to your coil’s specific resistance and mass.
- A quality chipset in an 80W mod will outperform a budget 200W mod due to stable power delivery and minimal voltage drop.
Why Does Your 200W Mod Produce Less Vapour Than Your Friend’s 80W Setup?
This is one of the most confusing and frustrating scenarios for a new box mod user. You’ve invested in a high-powered 200W device, yet your friend’s 80W mod is producing denser clouds and better flavour. The reason almost always comes down to a factor most vapers overlook: chipset quality and overall system synergy. The advertised maximum wattage is often just a marketing number. The real-world performance is dictated by the efficiency and intelligence of the electronics board—the chipset—at the heart of the mod.
Premium chipsets, like those from Evolv (DNA) or YiHi, are engineered for performance. They deliver incredibly accurate power, have a near-instantaneous « ramp-up » time (the time it takes to deliver the selected wattage to the coil), and maintain stable power output throughout your puff with minimal voltage drop. Budget chipsets found in many mass-market 200W mods often suffer from slow ramp-up and significant power degradation under load. This means that while the screen says « 200W, » the device may only deliver a fraction of that power effectively during a typical 3-second puff.
This is why a well-built 80W mod with a top-tier chipset can feel more powerful and satisfying than a 200W mod with inferior electronics. It’s not just about the chipset, though. As performance benchmarking data indicates, optimal vapor production requires perfect synergy between coil heat flux, airflow velocity, and wicking speed. Your friend’s 80W setup is likely a perfectly balanced system where the coil is designed for that power, the airflow is matched, and the chipset delivers that 80W instantly and consistently. Your 200W mod, if paired with an inefficient coil or mismatched airflow, is just wasting power and failing to achieve effective vaporisation. It’s the ultimate proof that in the world of vaping, it’s not about how much power you have, but how intelligently you use it.
Now that you understand the principles of the entire system, the next logical step is to apply this knowledge. Stop chasing higher wattage numbers and start building a balanced, synergistic setup that is perfectly tuned to your preferences and your e-liquid. Evaluate your current gear not by its specs, but by its performance, and make targeted upgrades where they truly matter—be it a better chipset, a more suitable coil, or higher quality batteries.