In summary:
- Sweet e-liquids are the primary cause of premature coil failure due to sweetener caramelization, not just because they’re ‘dirty’.
- A meticulous 5-minute priming process, including ‘primer puffs’ and a gradual power ramp-up, is the most crucial step to prevent burning a new coil.
- Adjusting a single setting on your mod—enabling Temperature Control (TC) mode—can dramatically increase coil lifespan by preventing overheating.
- Understanding the taste of a dying coil (muted, caramelised, or burnt cotton) is a diagnostic skill that saves you money.
It’s a frustratingly common story for many UK vapers. You install a fresh, new coil, prime it carefully, and for a few glorious days, the flavour is crisp and perfect. Then, suddenly, it’s gone. A harsh, burnt taste takes over, or the flavour just vanishes, leaving a dull, muted vapour. You look at the calendar and realise it’s only been four days, while forums and friends boast about their coils lasting two, even three weeks. The cost adds up, and the waste feels excessive. You’re left wondering: what are they doing that I’m not?
The usual advice feels like a broken record: « Prime your coils properly, » « Don’t chain vape, » or « Turn down your wattage. » While not incorrect, this advice barely scratches the surface. It treats the symptoms without diagnosing the underlying disease. The truth is, extending the life of your vape coil isn’t about following a few simple rules; it’s about understanding the hidden forces at play—a mix of chemistry, physics, and what we’ll call your personal ‘Coil Economy’.
This guide moves beyond the platitudes. We’re not just going to tell you *what* to do; we’re going to explain *why* it works, giving you the diagnostic knowledge of a coil performance specialist. We will dissect the number one coil killer that’s likely in your tank right now, master the priming process with scientific precision, and reveal the one setting on your device that can act as a financial safety net for your coils. By the end, you won’t just be replacing coils less often; you’ll be in complete control of your vaping costs and flavour experience.
To help you navigate this deep dive into coil longevity, this article is structured to build your expertise from the ground up. Explore the topics below to become a master of your own coil economy.
Contents: A Vaper’s Guide to Coil Longevity
- Why Sweet E-Liquids Destroy Coils 5x Faster Than Tobacco Flavours?
- How to Prime a New Coil in 5 Minutes Without Wasting E-Liquid?
- Mesh Coils or Traditional Coils: Which Delivers Better Flavour for Fruity E-Liquids?
- The 3 Taste Changes That Signal Your Coil Needs Replacing Today
- How to Add 10 Extra Days to Your Coil Life by Adjusting One Setting?
- Why Mesh Coils Heat 200% More E-Liquid Surface Than Traditional Wire?
- How Long Should You Wait After Installing a New Coil Before Vaping?
- Why Does Your New Coil Taste Burnt From the Very First Puff?
Why Sweet E-Liquids Destroy Coils 5x Faster Than Tobacco Flavours?
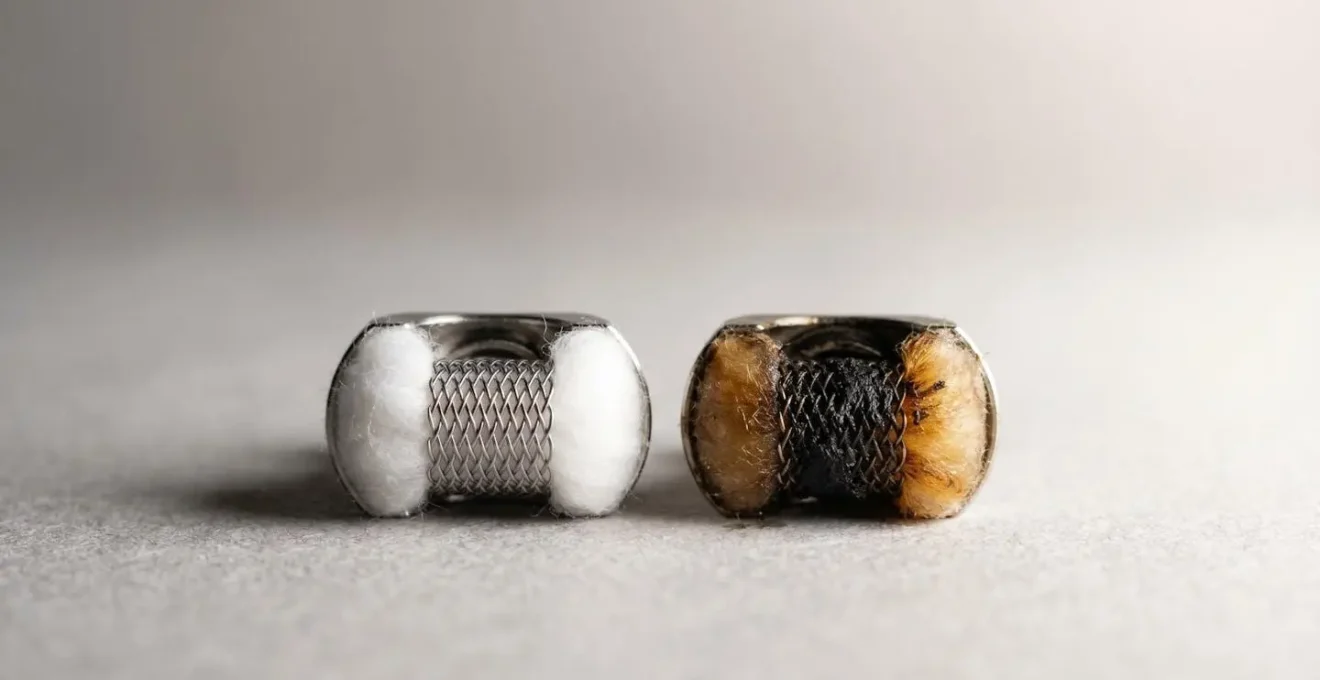
The single biggest factor in your personal ‘Coil Economy’ is the e-liquid you choose. While tobacco and menthol flavours can be kind to your coils, dessert, candy, and intensely sweet fruit flavours are often relentless assassins. The culprit isn’t the flavouring itself, but the unlisted sweeteners—most commonly sucralose—added to give that sugary kick. These sweeteners are the primary reason your coils are dying prematurely.
When your coil reaches its operating temperature of around 200°C, the sucralose doesn’t vaporise cleanly. Instead, it undergoes a process called pyrolysis, effectively caramelizing and burning onto the wire. This creates a dark, sticky crust on the heating element. This gunk is more than just ugly; it acts as a thermal insulator. The coil now has to work much harder and get significantly hotter just to vaporise the liquid through this insulating layer. This process accelerates wear, creates hotspots that lead to dry hits, and encrusts the cotton, chokes the liquid flow, and ultimately kills the flavour.
Essentially, every puff with a heavily sweetened liquid is a micro-deposit into a ‘gunk fund’ that bankrupts your coil. To improve your coil’s lifespan, the most effective change you can make is to be more selective with your e-liquid. Here are some strategies:
- Choose e-liquids with low or no sweetener content. Brands are often tight-lipped, but community reviews can be revealing.
- Look for clear liquids. While not a foolproof rule, intensely coloured e-liquids often correlate with higher levels of flavourings and sweeteners that gunk up coils.
- Opt for tobacco, menthol, or less complex fruit flavours over rich dessert or candy profiles.
- Ask for advice at your local vape shop; experienced staff often know which brands are known for being ‘coil-friendly’.
How to Prime a New Coil in 5 Minutes Without Wasting E-Liquid?
If sweetened e-liquid is the primary cause of long-term coil death, improper priming is the number one reason for immediate execution. A burnt taste on a brand-new coil is almost always the result of firing the device before the cotton wick is fully saturated. This instantly scorches the cotton, and once burnt, there is no going back. Investing a deliberate five to ten minutes in priming isn’t a chore; it’s the most profitable investment you can make in your coil’s lifespan.
The goal is to ensure every last fibre of cotton within the coil head is completely soaked before any heat is applied. The process below is methodical and creates a vacuum to help pull liquid into the core, ensuring maximum saturation without flooding or wasting liquid.
- Direct Saturation: Begin by dripping 3-4 drops of your e-liquid directly onto each visible cotton wicking port on the side of the new coil. You’ll see the cotton darken as it absorbs the liquid. If cotton is visible through the top, add 2-3 drops there as well.
- Install and Fill: Screw or push the newly primed coil into your tank. Hand-tight is sufficient; over-tightening can cause issues. Fill your tank with e-liquid.
- The Patient Wait: Let the assembled tank sit upright for a minimum of 10 minutes. This allows the liquid to slowly and fully penetrate the densely packed cotton via capillary action.
- The Vacuum Pull (Primer Puffs): Close the airflow on your tank completely. Without pressing the fire button, take 3-4 strong, deliberate draws from the mouthpiece. This creates suction inside the tank, physically pulling e-liquid through the cotton to saturate any remaining dry spots.
- The Bedding-In Process: Open the airflow to your desired setting. Set the wattage to the lowest recommended power for your coil. Take 5-6 gentle, short puffs. Then, gradually increase the power in 5W increments over the next 15-20 puffs until you reach your preferred wattage. This gently ‘beds in’ the cotton and wire.
Mesh Coils or Traditional Coils: Which Delivers Better Flavour for Fruity E-Liquids?
The type of coil you use is a fundamental choice in your ‘Coil Economy’, directly impacting both flavour and running costs. The debate between mesh and traditional wire coils isn’t about which is ‘better’ overall, but which is better for your specific goals, particularly with fruity e-liquids. Mesh coils, with their large surface area, are famed for delivering an intense, bright flavour ‘pop’ from the very first puff, making fruit notes vibrant. However, this performance comes with trade-offs.
Traditional coils, typically a single wire wrapped in a spiral, provide a more focused, ‘hot’ vape. Mesh coils, on the other hand, are a strip of perforated metal that heats up almost instantly and evenly across a much wider surface. This difference is the key to their performance characteristics. The following table, based on data from a detailed performance showdown, breaks down the key differences:
| Performance Factor | Mesh Coils | Traditional Wire Coils |
|---|---|---|
| Flavor Intensity | More intense and accurate flavor profiles due to larger surface area and even heating | Good flavor but requires higher wattages to achieve similar intensity |
| Flavor Consistency | Intense ‘pop’ initially but can fall off quickly once gunked | Longer ‘sweet spot’ with more gradual flavor decline over time |
| Vapor Production | Denser, more consistent vapor clouds without excessive power | Impressive clouds at higher wattages but more variability |
| Heat-Up Time | Near-instant ramp-up due to low mass of mesh | Slower ramp-up, requires more time between puffs |
| Lifespan | Tend to last longer due to wider surface area and even heat distribution | Shorter lifespan, more prone to burning out in specific spots |
| Flavor Ghosting | Larger porous surface holds onto previous flavors more stubbornly | Compact wick releases old flavors more easily when switching |
| Best Use Case | High-VG shortfills, bold sweet flavors, cloud production | Subtle tobacco/menthol notes, flavor-switching, longevity-focused vaping |
For fruity e-liquids, mesh is the clear winner for initial flavour intensity. However, its large surface area also provides more ‘real estate’ for sucralose to caramelize onto. This means that while a mesh coil might last longer with a clean liquid, it can gunk up and lose its flavour just as quickly, if not faster, than a traditional coil when used with very sweet juices. The choice comes down to your Flavor-to-Cost Ratio: are you willing to accept higher running costs (more e-liquid and faster battery drain) for a superior initial flavour experience?
The 3 Taste Changes That Signal Your Coil Needs Replacing Today
Your tongue is the most sensitive and accurate diagnostic tool you own. Learning to interpret the subtle (and not-so-subtle) changes in taste can tell you exactly what’s wrong with your coil and when it’s time for a replacement. Ignoring these signals not only leads to a poor vaping experience but can mean you’re vaping on a gunked-up coil longer than you need to. While generally, vape coils last anywhere from a few days up to four weeks, taste is the true indicator, not the calendar. There are three key stages of flavour degradation to watch for, which we can call the ‘Burn Spectrum’.
Recognising where your vape sits on this spectrum helps you diagnose the problem. Is it a sweetener issue, or a wicking failure? This knowledge helps you decide if a change of liquid might save it, or if it’s truly at the end of its life.
- The Muted Flavour: This is the first warning sign. Your favourite complex strawberry dessert flavour suddenly tastes… vague. The vibrant top notes are gone, and all you’re left with is a dull, flat sweetness. This indicates that the first layer of gunk has formed on your coil, acting as an insulating barrier that prevents the e-liquid from vaporizing efficiently and cleanly.
- The Caramel Burn: This is the next stage. The taste is no longer just muted; it’s actively unpleasant. You get a sweet, but slightly acrid, caramelized sugar taste that taints every puff. This is a clear signal that the sweetener build-up (the gunk) is now so significant that you are tasting the burnt residue itself. This is almost exclusively a sweetener/juice issue.
- The Cotton Burn: This is the final, undeniable signal of death. The taste is harsh, dry, and acrid, like inhaling smoke from burning fabric. There is no sweetness, only a throat-searing harshness. This indicates a wicking failure. The cotton is no longer saturated with liquid when you fire the device, so the coil is directly burning the dry cotton. This can happen from chain-vaping too quickly, using a wattage that’s too high, or simply because the coil is old and the cotton has lost its absorbency.
If your coil floods the chimney, causing gurgling, spitback and leaking, this is another sign of failure. The cotton has become so compressed and non-absorbent that it can no longer hold the liquid effectively.
How to Add 10 Extra Days to Your Coil Life by Adjusting One Setting?
Beyond juice selection and priming, there is a powerful, yet often overlooked, feature on many modern vape mods that can act as the ultimate safety net for your coils: Temperature Control (TC). For vapers frustrated with inconsistent coil life and the dreaded dry hit, TC isn’t just a gimmick; it’s a game-changing, money-saving technology. It functions like an ‘automatic transmission’ for vaping, preventing the single most destructive event for a coil: overheating due to an undersaturated wick.
In standard wattage mode, you tell the mod to send a fixed amount of power to the coil, regardless of its condition. If the wick is dry, that power has nowhere to go but into burning the cotton. In TC mode, you set a maximum temperature limit for your coil. The mod constantly monitors the coil’s resistance (which changes with temperature) and intelligently adjusts the power output in real-time to ensure it never exceeds that limit. If the wick starts to dry out and the coil begins to get too hot, the mod simply cuts the power. The result? No more dry hits. Ever.
As experts from Vaping360 note, this provides a level of consistency that wattage mode can’t match.
Temperature control vaping can be an amazing experience. It provides the security of consistency that wattage vaping often lacks. No one likes dry or burnt hits, or vapes that get too hot with long hits. TC vaping solves that.
– Vaping360, Beginner’s Guide for Vaping with Temperature Control
Setting it up is straightforward:
- Ensure your mod supports TC mode and you are using a TC-compatible coil wire type (Stainless Steel – SS, Titanium – Ti, or Nickel – Ni200). SS316L is the most common and versatile.
- Switch your mod to TC mode and select the correct wire material (e.g., ‘TC-SS’).
- Crucially, ensure the coil is at room temperature, then lock the coil’s resistance on your mod. This gives the mod an accurate baseline to work from.
- Set your desired maximum temperature, typically between 200°C and 250°C (392°F – 480°F). Start low and adjust upwards to find your sweet spot.
- Set a wattage limit as well (e.g., 40-50W). This controls how quickly the coil ramps up to your target temperature.
Why Mesh Coils Heat 200% More E-Liquid Surface Than Traditional Wire?
The superior flavour intensity of mesh coils isn’t magic; it’s a matter of pure physics and surface area. A mesh coil is essentially a sheet of perforated metal, like a tiny chain-link fence. A traditional coil is a single strand of wire wrapped into a spiral. This fundamental structural difference means that for the same internal diameter, a mesh coil provides a significantly larger heating surface compared to a regular coil. This larger surface area is the key to its performance, but also to its hidden costs.
When you fire your device, the entire surface of the mesh heats up almost instantaneously and evenly. This vaporizes a large, thin film of e-liquid all at once, creating a dense, flavourful cloud. A traditional coil, by contrast, has a smaller contact area with the cotton, creating a more concentrated ‘hot spot’ of vaporisation. This is why mesh coils are so effective with high-VG liquids and produce such intense flavour from the start.
However, this massive surface area advantage comes with significant trade-offs that directly impact your ‘Coil Economy’:
- E-Liquid Consumption: Vaporizing more liquid with every puff means your tank will empty much faster. The efficiency of mesh comes at the cost of higher consumption.
- Battery Drain: Maintaining heat across a larger surface area requires more power from your battery, leading to a noticeable reduction in battery life per charge.
- Gunk Real Estate: The vast surface area that produces great flavour also provides a massive ‘landing strip’ for sucralose to caramelize. A sweet liquid can gunk up a mesh coil very quickly, leading to rapid flavour drop-off.
- Puffing Technique: Mesh coils benefit from shorter, faster puffs. Long, slow draws can cause the large surface to overheat the liquid, potentially muting delicate flavours.
In essence, choosing a mesh coil is a decision to prioritize immediate, intense flavour and cloud production over running costs. It’s the performance sports car of the coil world: exhilarating but thirsty. For vapers focused purely on longevity and minimising costs, a well-built traditional coil used with a less-sweet liquid may offer a better long-term value proposition.
How Long Should You Wait After Installing a New Coil Before Vaping?
The « ten-minute rule » is a widely accepted benchmark for priming a new coil, and it’s a solid piece of advice. As a leading guide on the topic states, « While some manuals suggest five minutes, waiting 10 minutes ensures a fully primed coil, ready for action. » This wait allows capillary action to do its work, drawing e-liquid from the tank into the dense heart of the cotton wick. However, a true coil specialist knows that the ideal waiting time isn’t a fixed number; it’s a variable dependent on your specific setup, primarily your e-liquid’s viscosity (VG/PG ratio) and your tank’s design.
Thicker e-liquids, those with a higher Vegetable Glycerin (VG) content like 70/30 or 80/20 shortfills, flow much more slowly than thinner 50/50 liquids. Furthermore, the small 2ml TPD-compliant tanks common in the UK exert less hydrostatic pressure on the coil’s wicking ports compared to larger ‘bubble glass’ tanks. This reduced pressure means the thick liquid has a harder time penetrating the cotton.
Therefore, a more nuanced ‘wait time formula’ is required:
- For 50/50 PG/VG Liquids: A wait time of 5-7 minutes is generally sufficient. The thinner liquid wicks quickly and easily.
- For High-VG Liquids (70/30 or higher) in a small 2ml tank: You must wait 10 minutes or more. This combination presents the highest risk of a dry hit, as the thick liquid struggles to wick against low pressure. Be patient.
- For High-VG Liquids in a larger (>4ml) tank: A wait time of 7-10 minutes is a safe bet. The increased liquid volume exerts more pressure, aiding the wicking process.
Before you even think about pressing the fire button, perform the ‘Primer Puff Test’: close the airflow, take a few short draws, and if you can taste your e-liquid flavour, the wick is likely saturated. If you only taste air or a faint hint of cotton, it needs more time. Remember, patience during this stage is what separates a coil that lasts three weeks from one that’s burnt in three minutes.
Key takeaways
- Sweeteners aren’t just sweet; they caramelize through pyrolysis, creating a destructive ‘insulating’ layer that forces your coil to overheat and fail.
- Priming isn’t just wetting the cotton; it’s a multi-stage process including a 10-minute wait, ‘primer puffs’ to create a vacuum, and a gradual power ramp-up to bed in the coil.
- Temperature Control (TC) mode is the single most effective, yet underused, feature for preventing the dry hits that instantly destroy coils and dramatically extending their functional life.
Why Does Your New Coil Taste Burnt From the Very First Puff?
There is no more disheartening experience in vaping than taking the first puff from a brand-new coil and being met with the acrid taste of burnt cotton. You’ve wasted the coil, the liquid in the tank, and your money. While it’s tempting to blame a ‘faulty coil’, the reality is that immediate burnout is almost always due to a preventable error in the setup process. As manufacturer data indicates, a burnt taste on a brand-new coil usually means the wick wasn’t fully saturated, the power was set too high, or you chain-vaped before the cotton could re-soak.
Before installing your next coil, treat it like an aircraft pilot running through a pre-flight checklist. This systematic approach eliminates the common variables that lead to instant failure and empowers you to take control. If an entire pack of coils does turn out to be faulty (e.g., they all fail instantly despite following this checklist), remember your rights. Under the UK’s Consumer Rights Act 2015, goods must be of ‘satisfactory quality’, and you are entitled to a refund or replacement from the seller.
Your Pre-Flight Checklist to Prevent Instant Burnout
- Seating and Connection: Is the coil fully screwed in and seated correctly? A poor connection can lead to inaccurate resistance readings and power delivery issues. Check the threading is clean and the connection is secure but not over-tightened.
- Initial Wattage Setting: Is your mod’s wattage set to the coil’s minimum recommended power, or even slightly below? Always start 10-15% below the minimum rated power for the first few ‘bedding-in’ puffs for maximum safety.
- Priming and Waiting Protocol: Have you primed the coil directly AND waited according to your e-liquid’s VG ratio? A 10+ minute wait is non-negotiable for high-VG liquids in small UK tanks.
- Primer Puff Confirmation: Did you perform a ‘primer puff’ test before firing? Take a few unpowered draws with the airflow closed. If you can’t taste your e-liquid flavour, the wick is not ready. Wait longer.
- Manufacturing Defect Check: Before installation, give the coil a quick visual inspection. Does the wire spacing and cotton placement look symmetrical and consistent with other coils from the pack? If something looks obviously off, it’s better to discard it than risk it.
Stop guessing and start diagnosing. Apply these checks, understand the science behind what’s happening in your tank, and take back control of your vaping budget and experience. A long-lasting, flavourful coil isn’t a matter of luck; it’s a matter of knowledge.