Contrary to popular belief, buying expensive equipment is not the secret to huge clouds; mastering the underlying physics of your build is.
- Your coil’s resistance and mass (not just wattage) dictate the heat flux required for massive vapourisation.
- Airflow isn’t about being wide-open; it’s a delicate balance to create density, not just wispy volume.
Recommendation: Stop chasing higher wattage and start focusing on a single technical element, like your wicking density or inhale posture. Small adjustments here yield bigger results than any new mod.
You’ve done everything « right. » You invested in a high-end mod, a quality RDA, and premium, high-VG e-liquid. You watch the pros online, their rooms filling with thick, rolling clouds, and you try to replicate it. Yet, your results are… disappointing. The clouds are decent, but they lack the sheer volume and density of a competition-level plume. It’s a common frustration that leads many vapers to believe they need even more powerful, more expensive gear. You might even hear the usual advice to just « turn up the watts » or « open the airflow. »
But what if the problem isn’t the price tag on your equipment, but the technique you’re using? What if the key to unlocking massive vapour production lies not in raw power, but in a deeper understanding of the science at play? Competition-level cloud chasing is a discipline. It’s about mastering the intricate dance between heat, airflow, and timing. It’s about turning your premium setup from a simple device into a finely-tuned vapour engine.
This guide is your coaching manual. We’re going to move beyond the superficial advice and break down the technical skills the pros use. We’ll explore the science of coil resistance, the biomechanics of a perfect inhale, and the subtle adjustments that separate a good cloud from a great one. Forget buying another mod for now; it’s time to learn how to drive the one you’ve got.
In this guide, we’ll deconstruct the core components of elite cloud chasing, providing a clear roadmap to elevate your technique. The following sections will equip you with the knowledge to diagnose your setup and master each critical element.
Contents: Mastering Your Cloud Chasing Technique
- Why Cloud Competitions Require Dual Coils at 0.1 Ohms Minimum?
- How to Inhale for Maximum Cloud Density Without Coughing?
- Wide-Open or 75% Airflow: Which Setting Actually Creates Denser Clouds?
- The Cloud Chasing Habit That Kills Batteries in 3 Months Instead of 18
- When to Start Exhaling for the Most Impressive Cloud: The 2-Second Rule
- Why Wattage Means Nothing Without the Right Coil Resistance?
- How Much Cotton Is Too Much: The Wicking Density Sweet Spot for RDAs?
- Why Does Your Hand-Wrapped Coil Taste Better Than the £5 Pre-Built Version?
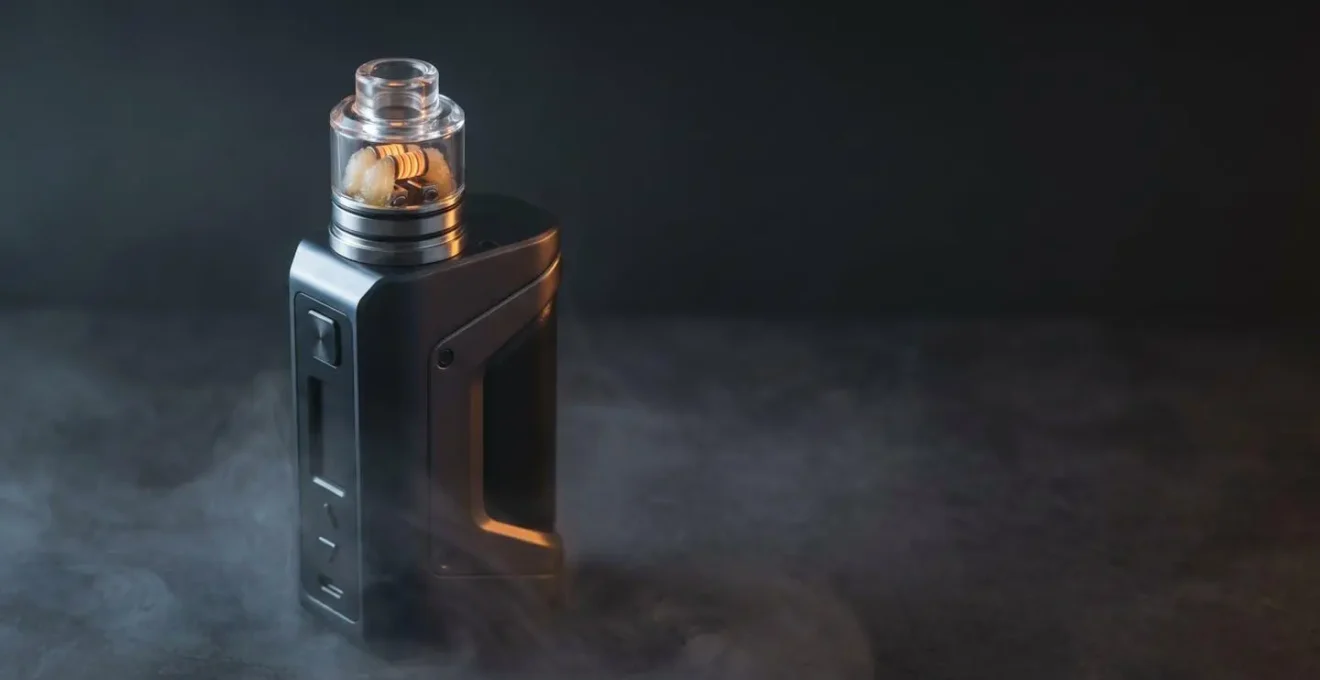
Why Cloud Competitions Require Dual Coils at 0.1 Ohms Minimum?
Let’s start with the engine of your build: the coils. The reason competitive cloud chasing is synonymous with very low resistance is simple physics. It’s about maximising surface area and heat flux. A lower resistance build, typically achieved with thicker wire or more complex coil types (like fused claptons), allows more electrical current to flow at a given voltage. This doesn’t just make the coil hotter; it heats up a much larger surface area almost instantaneously. More hot metal touching more e-liquid equals more vapour. A single coil, even at a low resistance, simply can’t match the sheer vapourising power of two.
This is why dual coils are the standard. They effectively double your surface area, and when built correctly, they halve the total resistance of your setup. Competitive vaping specifications confirm that coils rated below 0.5 ohms can handle more wattage and produce bigger clouds, with the serious end of the sport demanding builds as low as 0.1 ohms. This extreme level of sub-ohm vaping puts immense strain on your batteries, making safety a non-negotiable priority. You cannot use just any battery; you need cells designed for this specific stress.
High-wattage or sub-ohm vaping needs high-drain batteries (15A–30A). The best 18650 battery for vape must match your device’s discharge (amp) requirement, not just capacity.
– Ufine Battery Technical Team, Best 18650 Vape Battery Guide
Think of your dual 0.1-ohm coils as a high-performance racing engine. You wouldn’t put standard fuel in a Formula 1 car. Likewise, you must power your build with high-drain batteries (like Molicel P26A or Sony VTC5A) that can safely deliver the high amperage your coils are demanding. Without this foundation, you are compromising both performance and, more importantly, your own safety.
How to Inhale for Maximum Cloud Density Without Coughing?
You have the engine; now you need to master the intake. A common mistake among aspiring cloud chasers is to simply pull harder or longer, which often leads to a coughing fit or a thin, unsatisfying cloud. The key to a massive, dense inhale is not brute force, but proper technique and posture. This is about maximising your lung capacity and ensuring the vapour travels smoothly and directly, a method known as the Direct-to-Lung (DTL) inhale.
First, your posture is critical. Slouching constricts your diaphragm and reduces your lung capacity. To prepare for a competition-level inhale, stand or sit up straight, roll your shoulders back, and slightly tilt your head upwards. This straightens your trachea, creating an unobstructed « superhighway » for the vapour to travel directly to the deepest parts of your lungs. This isn’t just about comfort; it’s a biomechanical advantage.
Once your posture is set, the inhale itself should be fast and forceful, but not frantic. Think of it as a sharp, sudden gasp of air, not a slow, leisurely draw. This speed serves two purposes: it pulls a massive amount of vapour in a short time, and it helps keep your coils cool, preventing the harsh taste of burnt cotton. Many pros also use a « purging » technique: a brief, gentle exhale into the atomiser right before inhaling. This pre-heats the coils and gets the vapour production started, so your inhale immediately captures a dense plume.
Finally, the inhale should come from your diaphragm, not your chest. You should feel your stomach expand, not your shoulders rise. This deep, diaphragmatic breath is what allows you to fill your lungs to their maximum capacity without triggering a cough reflex. It takes practice, but mastering this inhale is the difference between blowing a cloud and becoming the cloud.
Wide-Open or 75% Airflow: Which Setting Actually Creates Denser Clouds?
Here we arrive at one of the biggest misconceptions in cloud chasing: that maximum airflow equals maximum clouds. It seems logical—more air, more vapour, bigger cloud—but the reality is far more nuanced. While you absolutely need significant airflow for a DTL inhale and to keep your low-resistance coils from overheating, fully open airflow can often be your enemy. The goal isn’t just volume; it’s vapour density.
Think of it like mixing a drink. Too much mixer (air) and you dilute the spirit (vapour), resulting in a weak, flavourless experience. In vaping, excessive airflow leads to a thin, wispy, and « lifeless » cloud that dissipates almost instantly. It lacks the thick, satisfying weight and hang-time of a competition-quality cloud. The trick is to find the sweet spot that provides just enough air to cool the coils while creating a slight resistance. This resistance helps to compress the vapour as it’s produced, resulting in a much denser, richer cloud.
When there is too much air flow occurring in a room while you vape, it can lead to the creation of clouds that appear thin, lifeless, and are difficult to manipulate.
– Vaping Cheap Editorial Team, A Competitive Vaping Guide – 8 Things You Need to Know
So, where is this sweet spot? For most RDAs, it’s not at 100% open. Start with your airflow wide open, take a draw, and listen. Now, close it down by about 25%. Take another draw. You should hear the « sizzle » of the coil become slightly more pronounced and feel a little more restriction. This is the zone you’re looking for. According to insights from professional events, competitors in Density Contests, where thickness is judged, are constantly fine-tuning their airflow. They aren’t just cranking it open; they are balancing it to prevent dilution while managing heat. Your ears are your best tool here: listen for that perfect, crisp sizzle that indicates optimal vapourisation, not the airy whistle of excessive cooling.
The Cloud Chasing Habit That Kills Batteries in 3 Months Instead of 18
Let’s talk about the unsung hero of your setup: the battery. You can have the best mod and the perfect coils, but if your power source is weak or mishandled, your performance will suffer, and your safety is at risk. The single most destructive habit for a cloud chaser is running batteries down until they are completely dead. Pushing your mod until the « Low Battery » warning flashes is like running a car’s engine without oil. It causes irreversible chemical damage and drastically shortens the battery’s lifespan.
A quality 18650 battery from a reputable brand is designed to last a significant number of charge cycles. In fact, quality batteries typically last 300-500 charge cycles, which translates to about 1-2 years of regular use for most people. However, « deep discharging »—running a battery below 20% of its capacity—puts extreme stress on its internal chemistry. For a cloud chaser who vapes at high wattages, this damage is amplified. Doing this repeatedly can slash the battery’s effective life from over a year to a mere 3-6 months. Not only does this become expensive, but a degraded battery also can’t provide the consistent amperage your coils need, leading to weak, underwhelming clouds.
The professional habit is to treat batteries like a relay team. Instead of running one set into the ground, competitive vapers carry multiple-paired sets and swap them out at around the 20-30% mark. This practice avoids the damaging deep discharge zone and keeps the cells operating in their optimal performance window. This ensures you always have the power you need for a strong hit and dramatically extends the overall life of your batteries, saving you money in the long run.
The difference in lifespan and cost is stark when you compare discharge practices. As a detailed analysis of battery care shows, the financial and performance impact of how you treat your batteries is significant.
| Battery Quality | Discharge Practice | Typical Cycle Life | Estimated Duration (Heavy Use) | Annual Cost Impact |
|---|---|---|---|---|
| Low-quality/Counterfeit | Frequent deep discharge (0-10%) | 200-300 cycles | 3-6 months | 4-8 battery replacements/year |
| Standard Quality | Regular discharge to 20-30% | 300-400 cycles | 6-9 months | 2-3 battery replacements/year |
| Premium (e.g., Molicel, Sony VTC) | Optimal 20-30% swap practice | 500+ cycles | 12-18 months | 1-2 battery replacements/year |
When to Start Exhaling for the Most Impressive Cloud: The 2-Second Rule
You’ve taken a perfect, deep DTL inhale. Now what? The final piece of the puzzle—and the one that creates the most visual impact—is the exhale. Many vapers simply blow the vapour out as soon as they’ve inhaled, resulting in a turbulent, messy puff that vanishes quickly. The secret to a dense, rolling cloud that hangs in the air is controlled pressure and timing. It begins with a brief pause, what we can call the « 2-Second Rule. »
After you complete your inhale, don’t exhale immediately. Hold it. Keep the vapour in your throat and lungs for just 2 to 3 seconds. This short pause allows the tiny superheated droplets of VG to cool slightly and coalesce, achieving a more uniform size. This process is crucial for creating a cohesive cloud that sticks together rather than dissipating into a formless haze. It’s a subtle but powerful step that adds immense density to your final output.
The Art of Cloud Cohesion
In competitive vaping events, it’s not just about the initial burst of vapour. Clouds are often measured for distance and cohesion using yardsticks. A competition judge once noted, « There is a skill to being able to keep a ball of vapor together without it dissipating. » This highlights that the exhale technique, particularly timing and pressure, directly impacts how well the cloud holds its shape and, therefore, how it scores. A cloud that travels 6 feet but stays together is more impressive than one that dissipates at 3 feet.
When you are ready to exhale, the technique is again about control, not force. Your mouth should be open and relaxed, forming an « O » shape, not pursed as if you’re blowing out a candle. The exhale itself should be a smooth, steady push from your diaphragm, like a singer holding a long note. Avoid a forceful, coughing puff, which creates turbulence and destroys the cloud. You want to create a laminar flow—a smooth, layered stream of vapour that rolls out and seems to hang in the air. This controlled, steady pressure is what gives clouds that impressive, billowing effect.
Your Action Plan: The Controlled Exhale
- Hold the Vapour: After a long drag, keep the vapour in your throat and lungs for 2-3 seconds to let droplets cool and unify.
- Position Your Mouth: Use an open, relaxed mouth in an « O » shape, not pursed lips, for the exhale.
- Exhale from the Diaphragm: Push the vapour out using your diaphragm, not your chest, for a smooth, laminar flow.
- Control Exhale Speed: Avoid fast, turbulent puffs. A slower, steadier exhale creates a cloud that rolls and hangs in the air longer.
- Maintain Steady Pressure: Keep the pressure consistent throughout the exhale to ensure the cloud remains cohesive and dense.
Why Wattage Means Nothing Without the Right Coil Resistance?
In the world of vaping, « wattage » is the most talked-about number, but on its own, it’s a vanity metric. Pushing your mod to 150 watts means nothing if your coils aren’t built to use that power effectively. The real metric that determines vapour production is Heat Flux—a measure of how much power is being concentrated over a specific surface area. This is where the critical relationship between wattage (power) and resistance (your coil build) comes into play.
Imagine two stovetops. One is a tiny camping stove (high-resistance coil) and the other is a large industrial burner (low-resistance coil). Turning them both up to « high » (high wattage) will produce very different results. The tiny stove will get red hot and might even melt, but it can only heat a small pan. The industrial burner can bring a huge pot of water to a boil in seconds. Your coils work the same way. A high-resistance coil has less mass and surface area. Pumping high wattage through it will likely just burn your cotton and give you a terrible taste because the heat is too concentrated in a small space.
A low-resistance coil, made from thicker or more complex wire, has much more mass and surface area. It requires high wattage just to reach the optimal vapourising temperature. But once there, that power is distributed evenly across a massive surface, vapourising a huge amount of e-liquid almost instantly. This is the sweet spot for cloud chasing. You are matching high power with a large surface area to achieve maximum heat flux without creating hotspots that scorch your liquid. This is why a 0.15-ohm build at 90W produces massive clouds, while a 1.2-ohm build at 90W would produce an instant dry hit.
So, stop chasing a number on your mod’s screen. Instead, focus on the synergy between your build and your power setting. Your goal is to find the wattage that makes your specific coils perform at their peak, producing a warm, dense, and flavourful vape without a hint of burning. It’s a balance you find through experimentation, not by simply maxing out the power.
How Much Cotton Is Too Much: The Wicking Density Sweet Spot for RDAs?
Your expertly built low-resistance coils are thirsty. The process of generating huge clouds vapourises e-liquid at an incredible rate, and your wicking is the fuel line responsible for keeping those coils saturated. If the fuel line is choked, your engine sputters. In vaping, this means the dreaded dry hit. The biggest trick with wicking is not just using enough cotton, but achieving the perfect wicking density to facilitate rapid capillary action.
Many vapers make one of two mistakes: they either use too little cotton, which can’t hold enough juice and leads to constant re-dripping, or they use too much. Packing the cotton too tightly into the coil is the more common and more problematic error. Overly dense cotton chokes the flow of e-liquid. While it might seem like it holds more juice, the compacted fibres actually prevent the liquid from moving freely from the deck to the centre of the coil where it’s needed most. This results in the outer layers of the wick being saturated while the core runs dry, causing a nasty, burnt taste and inconsistent vapour.
The goal is a wick that is snug but not strangled. It should have just enough resistance that you can feel it gently gripping the inside of the coil as you pull it through. A popular advanced technique for achieving this is the « Scottish Roll. » This involves taking a pad of cotton, gently stretching it to about twice its width to separate the fibres, and then lightly rolling it into a fluffy cylinder. This creates a wick that is full of air pockets, which act as channels for the e-liquid. The outside is firm enough to make contact with the coil, while the inside remains airy and absorbent, promoting lightning-fast capillary action.
When trimming the tails, you want them to be long enough to just touch the bottom of your RDA’s juice well. Don’t pack them down. The tails should be fluffed and left to rest gently on the deck. This ensures a smooth, unobstructed path for the juice to travel from the well, up the tails, and into the heart of your coil. Mastering this balance turns your wick from a simple piece of cotton into a high-performance fuel delivery system.
Key Takeaways
- True cloud performance comes from mastering Heat Flux (the balance of wattage and coil mass), not just from high wattage alone.
- Airflow should be optimized for vapour density, not maximum volume. Restricting airflow by ~25% often produces thicker, more impressive clouds.
- Wicking is a science of fuel delivery. The goal is not maximum cotton, but optimal density to promote rapid capillary action and prevent dry hits.
Why Does Your Hand-Wrapped Coil Taste Better Than the £5 Pre-Built Version?
You’ve likely noticed it yourself: a coil you’ve carefully wrapped by hand often delivers cleaner flavour and more satisfying vapour than a mass-produced, pre-built version. It’s not your imagination. While pre-built coils offer convenience, the craftsmanship and attention to detail involved in building your own coil have a tangible impact on performance, particularly in the realms of flavour purity and heat distribution.
The difference starts with the materials and preparation. When you build your own coils, you control every variable. You can ensure the wire is immaculately clean, free from any machine oils or residue left over from the manufacturing process. These invisible contaminants on pre-built coils can create an « off » taste on the first few hits, muting the complex notes of your e-liquid. Furthermore, building yourself allows for meticulous spacing and tensioning of the wraps, creating a perfectly even heating surface. Mass production can introduce tiny, invisible imperfections—a slightly wider gap here, a tighter wrap there—that create micro-hotspots.
The Craftsmanship of Coils
Advanced coil configurations like Fused Claptons or Alien coils are prized for their exceptional surface area, which leads to incredible flavour and vapour. The complex structure of an Alien coil, for example, creates thousands of tiny pockets that trap e-liquid, vapourising it for an intense taste. However, their performance is directly tied to the precision of the build. Hand-building allows a craftsman to perfectly align the outer wrap, eliminating the hotspots that are common in cheaper, machine-made versions and unlocking the coil’s true potential.
These hotspots are the silent killers of both flavour and performance. They scorch the e-liquid instead of vapourising it, creating a subtly burnt, caramelised taste that dulls the bright notes of your juice. By ensuring your coil heats up perfectly evenly from the inside out, you guarantee that you are tasting your e-liquid as the creator intended. This level of control and perfection is the final step in graduating from someone who vapes to someone who truly understands the art and science of building. It’s the moment you take complete ownership of your experience.
Stop guessing and start engineering. Pick one technique from this guide—whether it’s your inhale posture, your wicking method, or your battery habits—and dedicate a week to mastering it. True performance is built through deliberate practice, not impulse purchases. Your clouds will thank you.